Bloglovin'

Wednesday, May 29, 2013
Bloglovin
Follow">http://www.bloglovin.com/blog/7903303/?claim=86gzavqvq4x">Follow my blog with Bloglovin
Monday, May 27, 2013
Mark Your Calendar - June 22, 2013
Do you have some art or craft projects you would like to work on but just don't have the time?
Gather your supplies and projects and head over to my house on the Piney, Saturday June 22nd.
For a few hours we'll gather, chat, and create something beautiful!! This not a class but a gathering of folks that love to create, there is no cost.
We all have some unfinished project, even if its just sewing some buttons on a shirt. Maybe you just need help with getting your pattern for the Double Wedding Ring to work out or finish up that Nine Patch you started a couple of years ago. Bring them!!! Would you like to try your hand at smocking? I'll have my machine out.
I have a few sewing machines if you need them, or you can bring your own. I've also got the space for cutting out your project or simply sitting & sewing. Or maybe you just need a day with some friends...come on over!
I would love for you to come over and join me in this old fashioned quilting bee type of setting. We'll start about 9:00 and go until 12:00 or however long you want to stay!!
I'll have some light refreshments but you are welcome to bring something. There will be no childcare, but your children are welcome to come, but you'll have to watch them and FYI...my stairs and lofts are not toddler friendly yet. I do have a big yard away from the road. The house is not wheelchair accessible...sorry.

Let me know if you can make it and if you need anything special or better directions (GPS is not always user friendly out here).


Gather your supplies and projects and head over to my house on the Piney, Saturday June 22nd.
For a few hours we'll gather, chat, and create something beautiful!! This not a class but a gathering of folks that love to create, there is no cost.
We all have some unfinished project, even if its just sewing some buttons on a shirt. Maybe you just need help with getting your pattern for the Double Wedding Ring to work out or finish up that Nine Patch you started a couple of years ago. Bring them!!! Would you like to try your hand at smocking? I'll have my machine out.
I have a few sewing machines if you need them, or you can bring your own. I've also got the space for cutting out your project or simply sitting & sewing. Or maybe you just need a day with some friends...come on over!
I would love for you to come over and join me in this old fashioned quilting bee type of setting. We'll start about 9:00 and go until 12:00 or however long you want to stay!!
I'll have some light refreshments but you are welcome to bring something. There will be no childcare, but your children are welcome to come, but you'll have to watch them and FYI...my stairs and lofts are not toddler friendly yet. I do have a big yard away from the road. The house is not wheelchair accessible...sorry.
Piney's Needle
6794 Piney River Road N
Bon Aqua, TN 37025
Off Hwy 48 - in the Pinewood area, Hickman County
about 5 miles south of I-40, exit 163
Red-roofed, log-house sitting out in the field
931-996-8064 - Deborah's cell
The view from my front porch.
The view from my back porch.

My house.

Another view from my front porch.
Hope to see you!!
Saturday, May 25, 2013
Blank Canvas
Quilt designing is very much like painting with fabric. You start with a blank canvas and then start to create, adding color, turning blocks, until finally it is pleasing to your eye. While lots of quilts have the same pattern name, the way the artist changes the placement or color makes every quilt a unique work of art, no two alike...even if you try.
Applique gives you even more freedom to change up the pattern or design. In fact, you really do start with a blank canvas and can put anything on it. I wanted to do some wonky flowers with my grandmother's vintage fabrics. Here's what I came up with.
I went to the trunk first and pulled out some fabric, deciding on a layered flower. On paper, I drew off the layers of my flower and copied them onto freezer paper that will run through the printer. For the circles, I simply took a bowl and drew around it.
After copying my patterns onto the freezer paper (dull side), I cut each piece out (with scissors for cutting paper) and choose my layers of the flowers.


For the two bottom layers of my flower, I cut the patterns out adding a 1/4 seam allowance. For the top layer of the flower, because I am making a yo-yo out of it, I cut it out with no seam allowance. When adding that seam allowance as you cut, don't worry about being exact.

For the yo-yo, I removed the freezer paper and stitched a running stitch around the circle making a small hem. Make sure your thread is knotted on the end. Then I gently started to pull the thread, causing it to gather into a smaller circle.

 Once I have it all gathered, I knot off the thread and clip to keep the yo-yo from coming undone.
 Because I'm doing a layered flower, I can applique the top layers of the flower before putting onto my "canvas". For the middle layer, I simply did a needle turn applique stitch, which is simply turning the fabric under the 1/4 seam allowance as I go.

 Once I've gone all the way around, I flip the flower over and trim only the bottom layer away. This will reduce the layers of fabric for quilting later.
 I then added my yo-yo and a button to the center for another dimension.

 From the scraps of the freezer paper, I drew off some leaves of different shapes and sizes, cut them out and ironed them to the fabric. These were cut out adding a 1/4 seam allowance.
 On my "canvas", I placed the flower. Since I want my stem to go under the flower, I need to applique it on first, before I applique the flower. I will also need to applique some of the leaves under the stem, so I played with the placement. With the fabric cut away from the back of the flower, I fold it in half and make a bud for another flower.

Applique gives you even more freedom to change up the pattern or design. In fact, you really do start with a blank canvas and can put anything on it. I wanted to do some wonky flowers with my grandmother's vintage fabrics. Here's what I came up with.
I went to the trunk first and pulled out some fabric, deciding on a layered flower. On paper, I drew off the layers of my flower and copied them onto freezer paper that will run through the printer. For the circles, I simply took a bowl and drew around it.
After copying my patterns onto the freezer paper (dull side), I cut each piece out (with scissors for cutting paper) and choose my layers of the flowers.
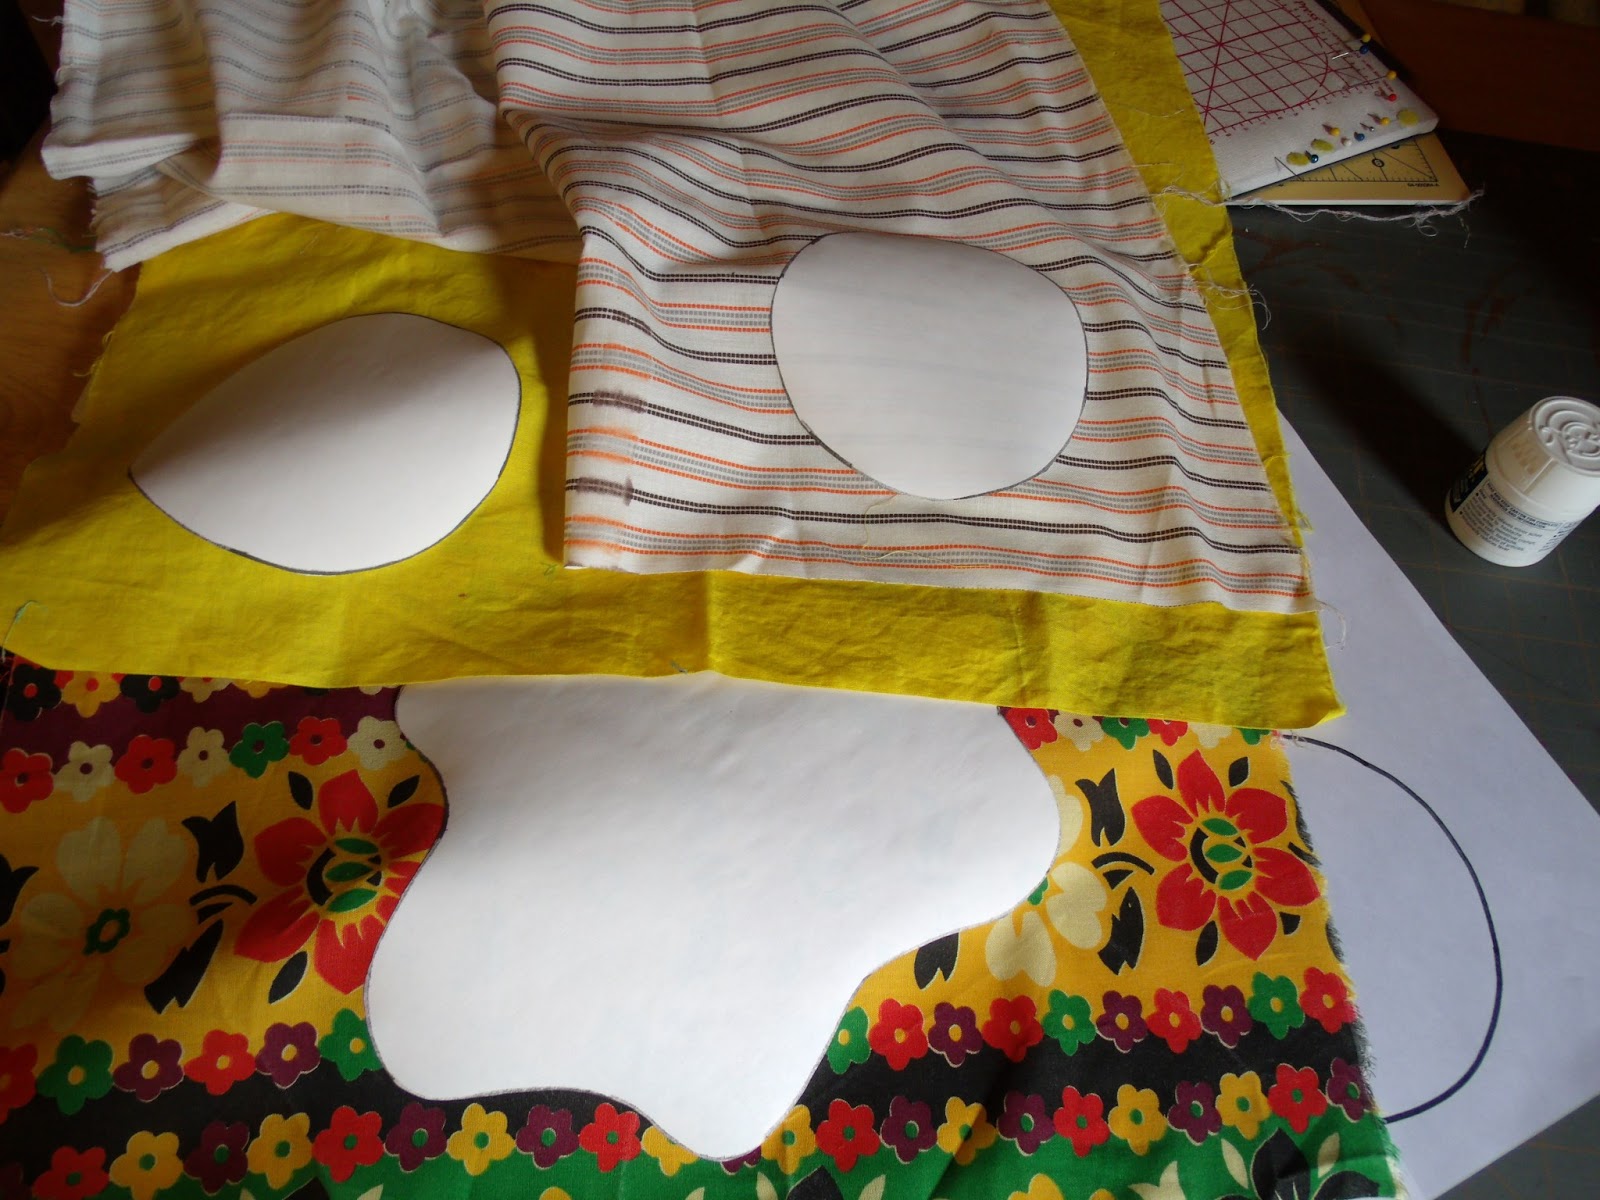
I did some fussy cutting with the bottom layer, realizing that only the edges of it would really be visible. Then I ironed the shinny side down to the fabric.


For the two bottom layers of my flower, I cut the patterns out adding a 1/4 seam allowance. For the top layer of the flower, because I am making a yo-yo out of it, I cut it out with no seam allowance. When adding that seam allowance as you cut, don't worry about being exact.

For the yo-yo, I removed the freezer paper and stitched a running stitch around the circle making a small hem. Make sure your thread is knotted on the end. Then I gently started to pull the thread, causing it to gather into a smaller circle.


For the stems, I cut 1 inch strips on the bias so that I can curve these as I want.
That's it for now. Come back later and see how this art piece turns out.
Thursday, May 23, 2013
Turkey Tracks - Which Way Do They Go?
Which layout do you like the best?


I think this is the one I like the best...below or the one below it.


I think this is the one I like the best...below or the one below it.
Quilts for Sale
These quilts have been (or are being) listed in my Etsy store, Piney's Needle. Click on each one if you are interested in the size and cost. If you order through my Etsy store, there is shipping cost and tax. If you are local, let me know and you can pick the item up and bypass the shipping. Just shot me an email, boutwell_d@bellsouth.net.


Orange Sherbet Toddler Quilt or Throw
Orange Sherbet Baby Quilt
Lemoyne Star Table Runners made from vintage blocks
Lemoyne Star Wall Hanging made from vintage blocks
Maple Leaf Wall Hanging

Scrappy Star Wall Hanging (link & info to be added)

Disappearing Nine Patch Sampler Table Runner (link & info to be added)

School Rules & Pledge (link & info to be added)
Wednesday, May 22, 2013
Following the Instructions
Patterns today and in the past come with instructions...but they also have pictures. I'll confess, I look at the pictures to figure out how the pattern goes together and then, when all else fails...read the instructions.
That is not the best way to make sure your piece will come out like the pictures.
Unfortunately, it is a lesson I have to learn over and over again....like this week.
This is the pattern I found this weekend. Turkey Tracks by Quilt in a Day

I flipped through the instructions...okay, the pictures. I was using scraps, so I didn't go with cutting the strips. There are only two pattern pieces for this block. Seemed pretty simple.
I marked all my pieces and then cut from the four colors. But something didn't turn out right.

Notice that some of these pieces are turned to the wrong side. It seems that the instructions said that I was to cut through two pieces at a time, laying right sides together, so that I would get mirror images of the pieces.
Back to the cutting board!

Got it right this time and now I have almost enough pieces cut to do two blocks.
I really like this lay out.
I marked all the pieces with the 1/4 inch seam allowance because getting all those points to come out right takes a little maneuvering. I'm hand piecing this block.

After pining at the point where the seam allowances intersect, I sewed to that point, not through, on the long sides of the blue center.

Then folding the piece, I pined the short sides and sewed from the marked intersection to the outside.

Then I laid out all the seams carefully and ironed.

Following the instructions really worked out well for this block. I really should start with the instructions more!

That is not the best way to make sure your piece will come out like the pictures.
Unfortunately, it is a lesson I have to learn over and over again....like this week.
This is the pattern I found this weekend. Turkey Tracks by Quilt in a Day
I flipped through the instructions...okay, the pictures. I was using scraps, so I didn't go with cutting the strips. There are only two pattern pieces for this block. Seemed pretty simple.
I marked all my pieces and then cut from the four colors. But something didn't turn out right.
Notice that some of these pieces are turned to the wrong side. It seems that the instructions said that I was to cut through two pieces at a time, laying right sides together, so that I would get mirror images of the pieces.
Back to the cutting board!
Got it right this time and now I have almost enough pieces cut to do two blocks.
I really like this lay out.
I marked all the pieces with the 1/4 inch seam allowance because getting all those points to come out right takes a little maneuvering. I'm hand piecing this block.
After pining at the point where the seam allowances intersect, I sewed to that point, not through, on the long sides of the blue center.
Then folding the piece, I pined the short sides and sewed from the marked intersection to the outside.
Then I laid out all the seams carefully and ironed.
Following the instructions really worked out well for this block. I really should start with the instructions more!
Sunday, May 19, 2013
Piney's Needle
I started this blog to showcase and document for my children the legacy passed down through the generations of quilters. Then it became a place where I kept up with my sewing and art projects. A few months ago, I stepped away from it and tried to combine all my blogs into one at HolyCamp. But that just wasn't working for me. So today I came back...to my roots...to my stitches.
If you are a writer, you just have to write and if you are an artist (of any kind) you just have to create.
While I have a normal job, where I sit behind a computer screen all day and work spreadsheets, deep inside me is the desire to do something where people will read it or look at and simply say, "that's beautiful".
Not for my glory, but for them, to inspire them, to encourage them, or to give them a reason to take a simple breath and be refreshed in some way. To look at a piece of art (wither it be on canvas, fabric, or paper) and for just a moment lose themselves in the beauty.
I simply want to create something beautiful.
God gave me some talents, I recognize that what I can do with a needle, pin/pen, paintbrush or keyboard is from Him. But it has to be for than just me, it has to be for Him and through me for you.
So....Piney's Needle.

Once Stitched Together, but always Piney's Needle in my mind.
When we lived in lower Alabama (LA as those in the area call it), I brought in extra money by sewing for shops and families. At that time it was mostly smocking and sewing clothes for children. The shop I did commissioned work for was featured in Sew Beautiful magazine and one of my smocked panels was highlighted. I was pretty proud of my work.
Moving back to Tennessee, about 12 years ago now, I entered one of my pieces in the county fair. They didn't even know how to judge it, there was no category for smocked and sewn clothes. I tried sewing for people here (like my mother did, my grandmother, and now my daughter does), but the smocked clothing wasn't as popular in this area as it had been in LA. So I put my smocking machine away and created other ways.
Quilting seems to be where my hands tend to wonder now.
I live in an area called Pinewood, my house sits on the Piney River. I live in a log house and it's very rustic and simple country living. In my mind I see that river flowing through a needle, bringing all it's beauty and ugliest through the eye and being transformed into a memory, something new, something beautiful, something to be treasured and past down from generation to generation.
So...Piney's Needle.
As I develop the site more and more, there will be links to my Etsy shop where you can purchase some of these treasures. There will also be contact information if you would like to commission me to make something for you. I'm going to be doing classes again and teaching. I might even try to develop the old quilting bee for the ladies in our community to gather face to face and encourage each other over a few loose threads.
Join me as I take a stab at this, be inspired, be encouraged, take a deep breath and be refreshed.
Beauty...create with me beauty.

If you are a writer, you just have to write and if you are an artist (of any kind) you just have to create.
While I have a normal job, where I sit behind a computer screen all day and work spreadsheets, deep inside me is the desire to do something where people will read it or look at and simply say, "that's beautiful".
Not for my glory, but for them, to inspire them, to encourage them, or to give them a reason to take a simple breath and be refreshed in some way. To look at a piece of art (wither it be on canvas, fabric, or paper) and for just a moment lose themselves in the beauty.
I simply want to create something beautiful.
God gave me some talents, I recognize that what I can do with a needle, pin/pen, paintbrush or keyboard is from Him. But it has to be for than just me, it has to be for Him and through me for you.
So....Piney's Needle.
Once Stitched Together, but always Piney's Needle in my mind.
When we lived in lower Alabama (LA as those in the area call it), I brought in extra money by sewing for shops and families. At that time it was mostly smocking and sewing clothes for children. The shop I did commissioned work for was featured in Sew Beautiful magazine and one of my smocked panels was highlighted. I was pretty proud of my work.
Moving back to Tennessee, about 12 years ago now, I entered one of my pieces in the county fair. They didn't even know how to judge it, there was no category for smocked and sewn clothes. I tried sewing for people here (like my mother did, my grandmother, and now my daughter does), but the smocked clothing wasn't as popular in this area as it had been in LA. So I put my smocking machine away and created other ways.
Quilting seems to be where my hands tend to wonder now.
I live in an area called Pinewood, my house sits on the Piney River. I live in a log house and it's very rustic and simple country living. In my mind I see that river flowing through a needle, bringing all it's beauty and ugliest through the eye and being transformed into a memory, something new, something beautiful, something to be treasured and past down from generation to generation.
So...Piney's Needle.
As I develop the site more and more, there will be links to my Etsy shop where you can purchase some of these treasures. There will also be contact information if you would like to commission me to make something for you. I'm going to be doing classes again and teaching. I might even try to develop the old quilting bee for the ladies in our community to gather face to face and encourage each other over a few loose threads.
Join me as I take a stab at this, be inspired, be encouraged, take a deep breath and be refreshed.
Beauty...create with me beauty.
Subscribe to:
Comments (Atom)