Bloglovin'

Follow on Bloglovin
Showing posts with label embroidery. Show all posts

Thursday, March 5, 2015

Bullion Stitch in a Button & Needle Turn Applique Technique

I've created a couple of videos to share.  The first one shows how to add the bullion stitched on a button and how to do needle turn applique.  The second video is showing the quilt blocks I've already made for the Tumbling Baskets, Flower Pot quilt I'm making.  You can find a post with detailed pictures of the process of making the block by clicking this link.


Saturday, July 26, 2014

Adding Details to Applique

Playing with my flower pot quilt blocks...and I do mean playing....has been so much fun.  I'm inspired by this summer's flowers, their color and their shapes.  However some are my own imagination while I play with fabric.

I think applique and embroidery just go naturally together and that's when the imagination really takes over.  Do I add stems in fabric or thread?  How to I give the flowers a 3-demionsional look?

And more importantly...for those that are not a fan of applique or embroidery...how do I do it?

As I was adding the details to my latest block, I thought I would snap a few pictures while I added the anthers and filament to the flower...yes, I had to go back to the science books to remember the parts of a flower.  If you look closely at a flower there is always a little fuzzy part and I was trying to figure out how to replicate that in my flowers.

I decided to use a bullion stitch, which uses a technique of wrapping the thread and pulling it tight.


 Here's the finished block.  I did a satin stitch for the stem of the flower with some vines running every which a way.  I took that idea from my grape vine.  I love how they just grab how of everything.

 For the look of a stamen (the anthers - fuzzy part at top, and the filament - the stem part), I did a long straight stitch and a bullion stitch at top..
To start the bullion stitch, bring your thread up at the place you want your stitch to begin. Then "take a bite" at the place you want your stitch to end, bringing your needle back up to the beginning stitch.  Do not pull the needle through yet.
 
Holding the needle up off the fabric, wrap the needle somewhat tightly 10 to 15 times...just depending on how long your stitch is.
Now pull your needle through the fabric.  The wraps should stay near the fabric, you may have to hold it with your finger as you pull the thread through.
 
Pull the thread tight, pulling it back to lay next to the straight stitch.
Put your needle back into the same place you took the "bite" earlier and pull you thread through to the back.
I added a bullion stitch to each straight stitch.
Give it a try and let me know if this was helpful.


Tuesday, July 1, 2014

Smocking 101

The technique of smocking is actually the process of getting pleats into an outfit and then doing embroidery over the pleats which will hold them in place.

There are machines that "smock" for you, or get the pleats into the outfit.  It's a strange contraption that uses bent needles to run through the fabric.  You can move the needles around, and the pleats take on a different look.

Half Space vs Space and a Half
 I'm doing an outfit for a newborn, so the pleats are gong to be tiny.  The last time I used my machine I was doing a larger outfit so the needles were set wider apart (picture above).  There are notches in the barrels of the pleater and you can set the needles every half space or space and a half.  Every half space has them right next together each other (like the ones on the end of the barrel above). 
 Using quilting thread, each needle is threaded.  I run a piece of wax or freezer paper through my machine first, it kind of waxes the machine and the thread for the fabric to move through easier, it will also hold my threads for the next time I want to use the machine.  Roll the outfit onto a dole stick and start feeding it through the machine.  I'm using 14 needles above.  The fabric will push itself onto the needles, but you have to help it along at times.  It's really important to feed the fabric through straight.
 Once it's all through the machine, I pull up enough thread to be able to play with the adjustments of the pleats.  Leaving the thread in the wax paper, I cut the threads and tie in a big loose knot.  Laying the dress flat, I spread the pleats out loosely and tie another knot in the other end of the thread.
 This style of dress is called a Bishop Dress because the pleats go all the way around from back, over the sleeves, the front, over the other sleeve and around to the back again.  It will button down the back or the front, depending on which you prefer.
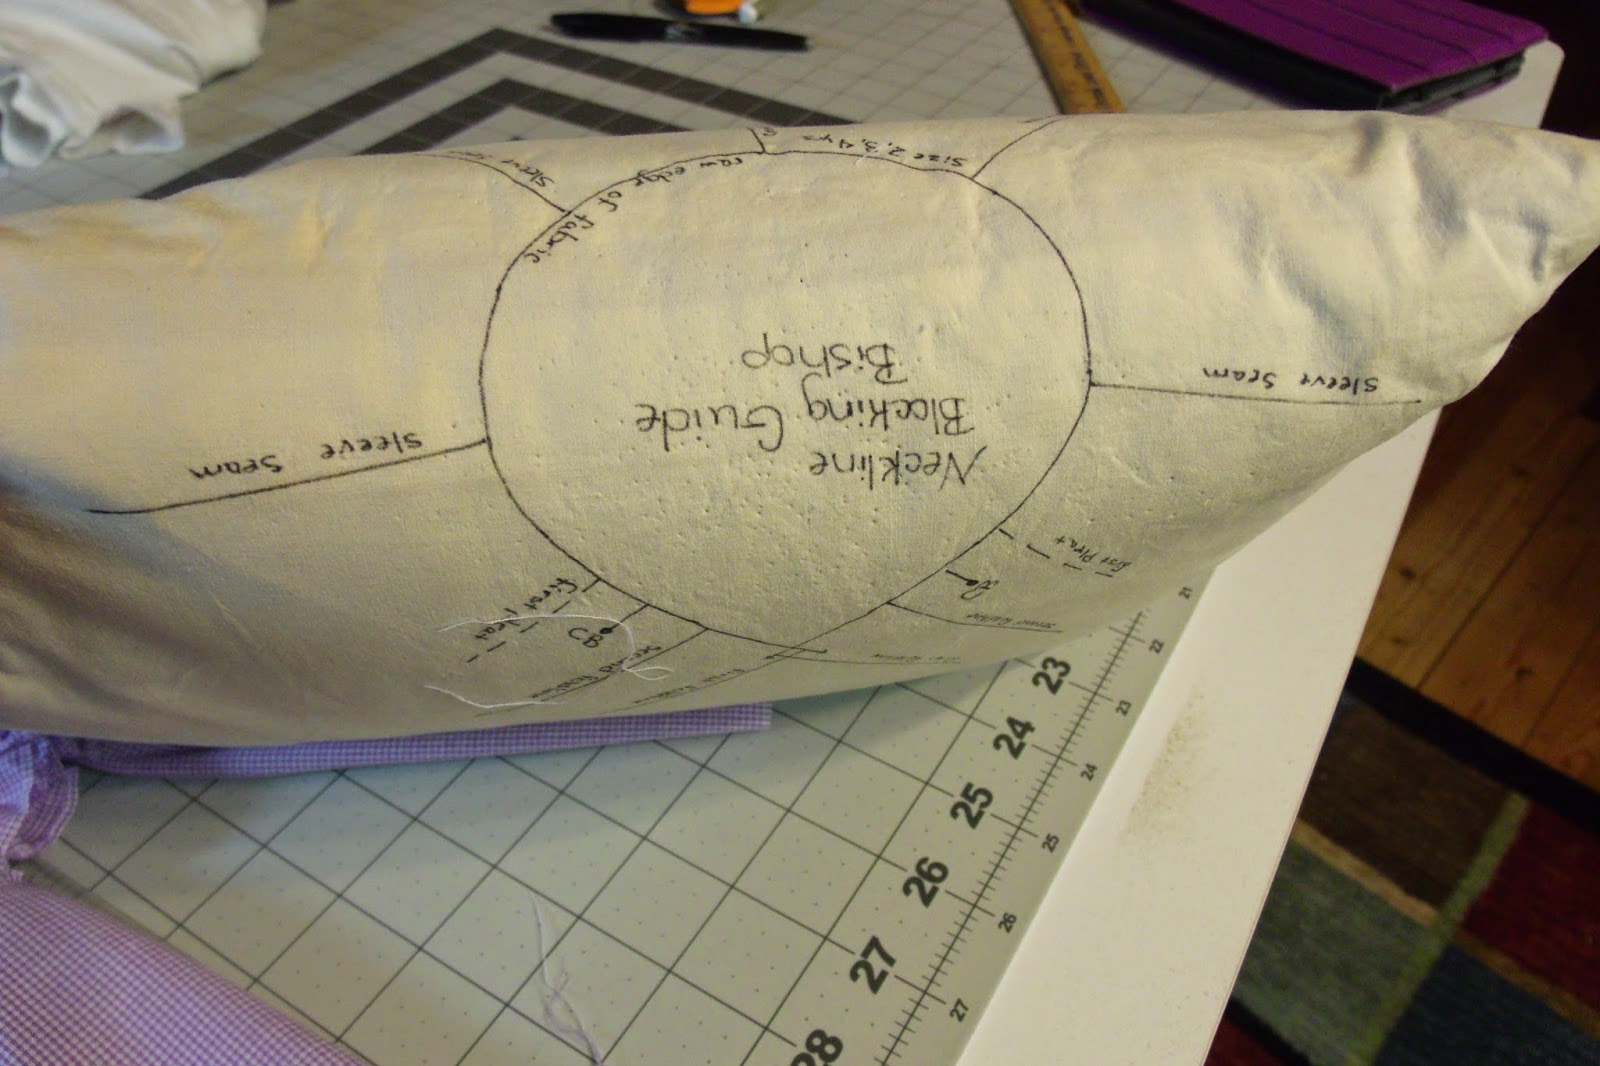
 I made a pillow for blocking my pleats several years ago.  It has a basic pattern for the Bishop dress, showing the placement for the center, sleeve seems and the back.  Each side of the pillow has different size patterns
 Taking the dress, I match up the center front, the sleeve seems and back folds to the pillow and pin.  Then gently I pull the threads until the dress is laying curved flat to the pillow.
 Once I have the basic form I'm looking for, I tie off my threads more securely.  Now I'm ready to start adding the embroidery.
Simple....right?

Sunday, June 8, 2014

Bringing Up Baby!

About 15 years ago, or maybe longer, I started doing custom-made clothes and items for families.  Living in Alabama at the time, I had about 3 families with 4 or more children, that requested matching play and dress clothes.  I was also doing custom work for a couple of children's shops in the Foley and Fairhope areas.

One of the mother's I was sewing for asked if I could make heirloom quality blankets and bids for her to give as shower gifts.  She keep me busy with those!

Recently I was asked if I had any baby items and I pulled out my old patterns and started playing around with some new ideas. 

Here's the result!


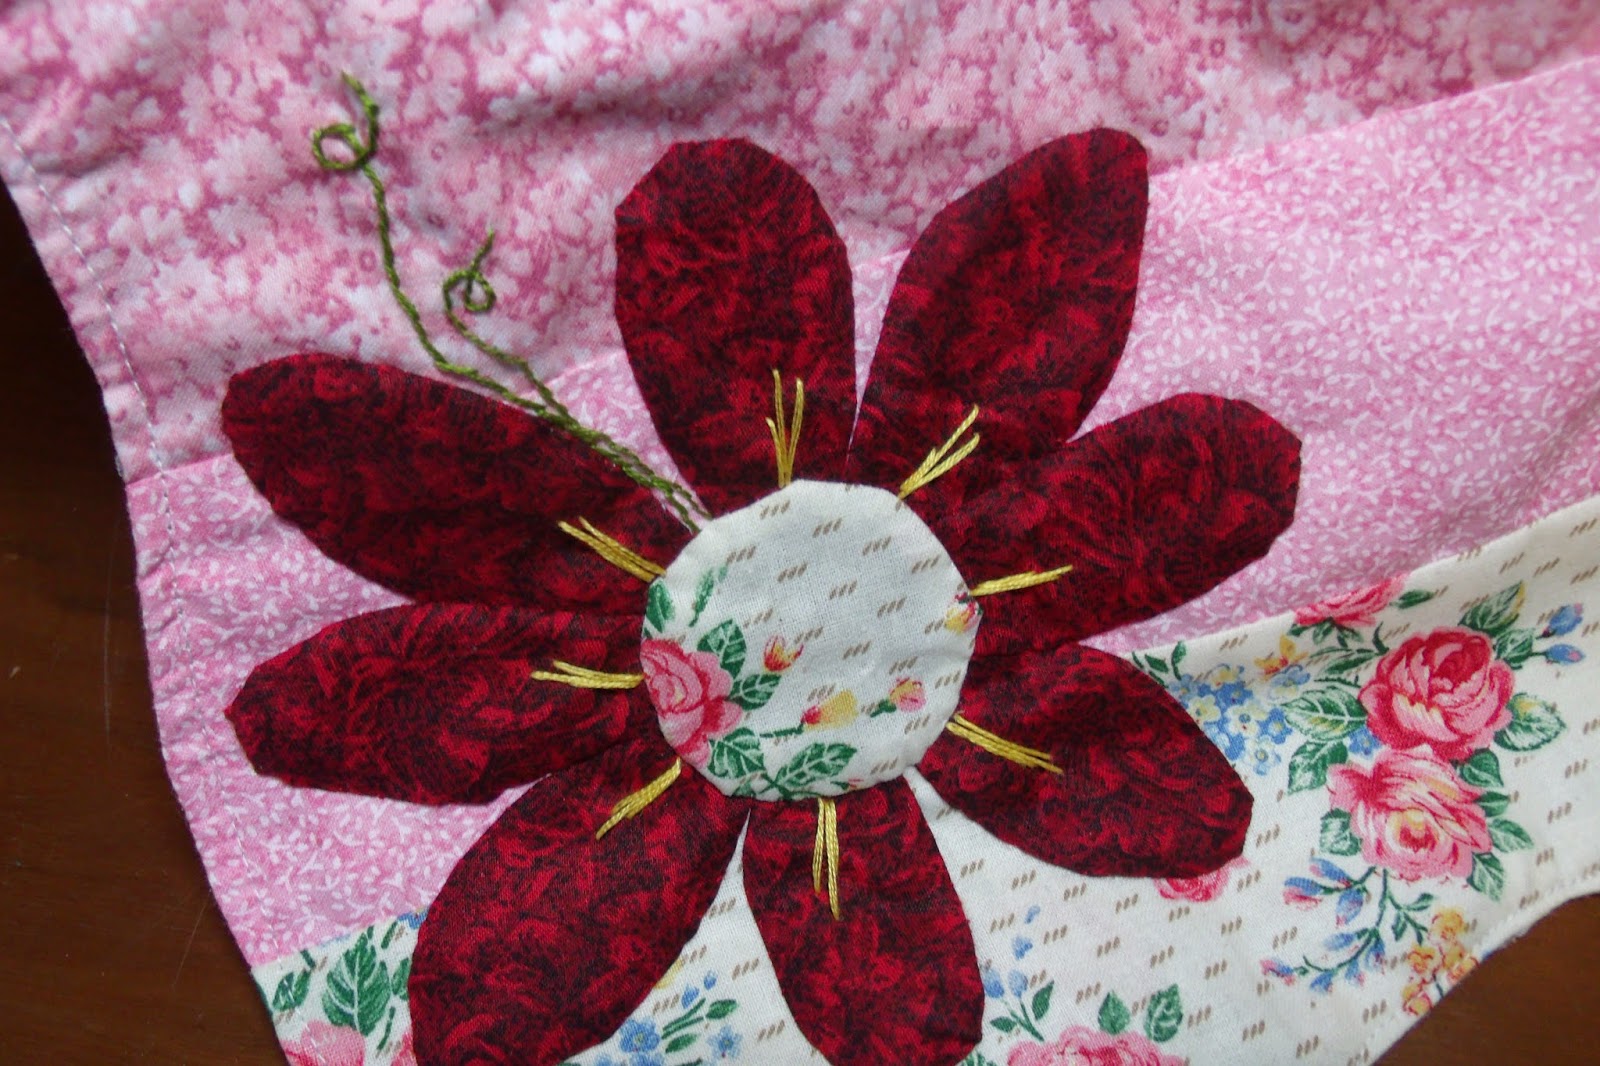
I love this curved pattern and I simply sewed rows of fabric together and then cut the pattern on the fold.  I wanted to add some "pretty" but also make it washable...because you know it going to get dirty!  I used scraps of fabric for the flowers and when I could, I free hand cut the petals, also on the fold and then hand appliqued them down.  I know, there are easier/faster ways, but I spent the day watching TV and talking with my daughter today, working on these, instead of under a machine all day.  That's the best part of hand applique.

I definitely think I'll be doing more of these.  This one is listed on my Etsy store, ready to be mailed to you!

Thursday, June 5, 2014

Wall Hangings

The quickest way to cover up a dirty spot on the wall or just an empty spot is with a wall hanging.  It's a way to add a splash of color and that homey feeling to those boring walls at work. (if you have boring walls at work :) ).

Today on Piney's Needle Facebook page, I shared images of my new office and two wall hangings that I added.  I'm only going to be in the office for about 2 months, so I needed something temporary and something to cover up hangers on the walls.  We aren't allowed to hang things ourselves or remove stuff, so I'm stuck with hangers from the previous occupant in odd places.  Two of the walls are also metal, so it is very hard to hang anything on them and I use lots of magnets or stick on pictures.

 This Curves wall hanging is new, using a ruler from Sew Kind of Wonderful.  This is the only thing I've made so far, but I can't wait to try more stuff with the ruler (which Granny B's in Dickson ordered for me and has some in stock).  This wall hanging is for sale, $65,  and I would be happy to take it down and mail it to you.  I can now take credit cards through my phone using Square!  It's 16 in x 36 in, with a hanging sleeve.  I've got just a simple dole stick through the hanger with a ribbon.  Magnets are holding it up on my wall.
                

To cover up the brackets from a previous dry erase board, I needed something a bit wider.  This floral wall hanging is my own design, made from vintage fabrics from my grandmother's stash, dating back to the 1960s.  This is also a metal wall, so I'm using magnets to hang, but they are resting on the brackets underneath, since this one is a little heavier.  It's also for sale, $65, 25 in x 29 in, with a hanging sleeve.
The flowers are all hand appliqued and the back ground is machine pieced and machine quilted.
I added a vintage button on the Yo-Yo center of the flower and some simple embroidery to enhance the stems.  The flower buds are just folded fabric appliqued down.

 I wasn't really fond of the flower at first, but now that it's finished, I really do like it.  The wall hanging just has a lot of movement to it.

These two pieces have really cheered my office up.

As I mentioned, they are both for sale, so let me know if you are interested.  
Contact me:
PineysNeedle@gmail.com


Monday, June 2, 2014

Tumbling Baskets


 I mentioned that I was doing something new and while this might not look new to you, since it is a very old pattern, I think I did something new with it.

I wanted to take the common flower basket and see if I could design my own block with it and this is what I've come up with.
I've drawn off the blocks on graph paper and I'll have lots of space for applique flower and stems once it starts going together.

 
Here's the basic layout.  
I'm using all scraps, white-on-white, cream-on-cream, and reds.
The background strips are from left over quilt backing projects, All cut in 2 1/2 inch strips.

The basket is made using a half-square triangle technique.  There are several techniques "out there" that you can use to get these triangles.

Assemble the basket as shown.
Here's my input that makes it a little different.

The first outside border strip is added to the bottom, however, don't sew it all the way across.  Stop sewing about half-way across.  If you sew it all the way across, you have to make a Y-seam, and this just seemed much easier to me.
Now add the outside strips in the order shown.

At this point, you can now finish sewing the first strip on.  No Y-seams. 
I like the way the blocks now match up and it will give me lots of applique and quilting areas.  I think if you add another boarder of the outside strips, but in color, it will also frame it up very nicely for another look.  I also like the play on the background color, using all the various scraps I had (harder to see in the pictures).

Tuesday, May 13, 2014

The Count-Down is On!

10 Days and counting.

10 Days until the Art & Ag Tour of Hickman County of which we are stop number #26.  Click here to get more information and a map of the county for a two-day self-guided tour through, what I consider, to be the prettiest county in Tennessee.

10 Days until May 23 & 24.

10 Days of late nights, finishing projects, labeling, cleaning, and sitting up.

And we are still thinking of things we would like to make for the show!  Once we get started, it's hard to stop the creative juices.

We...it's a family thing.  Sally, my daughter and I are doing all the sewing, arts, and demonstrations.  Ken, my husband, is cooking BBQ.  Courtney, my niece, is serving as our bouncer, serving as the guide for the in-house quilt display.  Adam, my son, has been told he must be there, at least Saturday to help us out with the hundreds of people we are hoping turns up.

And next door, my brother and his wife are doing the same thing.

The needles have been busy around here...until tonight!

After Sally spent the day getting several of her projects finished, the main sewing/quilting machine gave out.  So it's off to the repair shop for a little oil and cleaning.  We've been making it work so hard.  But it has to hurry back, because we only have 10 days!!!!

Here's a sampling of some of the things we've been working on.

Cards.


Needlework.
 Memory Quilts
 Wallhangings
And quilts.
I'll be giving quilting demonstrations using my grandmother's quilting frame, so I still have to get a quilt ready to go in the frame.  Plus I'll have some of my legacy of quilts on display.  Oh, I've got to get busy labeling them!

As a final project, I'm making bags.  The logo was Sally's idea to incorporate all that we will be doing, not just at our stop on the tour, but my brother's too.

Hope to see you in about 10 days!!!


Saturday, May 25, 2013

Blank Canvas

Quilt designing is very much like painting with fabric.  You start with a blank canvas and then start to create, adding color, turning blocks, until finally it is pleasing to your eye.  While lots of quilts have the same pattern name, the way the artist changes the placement or color makes every quilt a unique work of art, no two alike...even if you try. 

Applique gives you even more freedom to change up the pattern or design.  In fact, you really do start with a blank canvas and can put anything on it.  I wanted to do some wonky flowers with my grandmother's vintage fabrics.  Here's what I came up with.

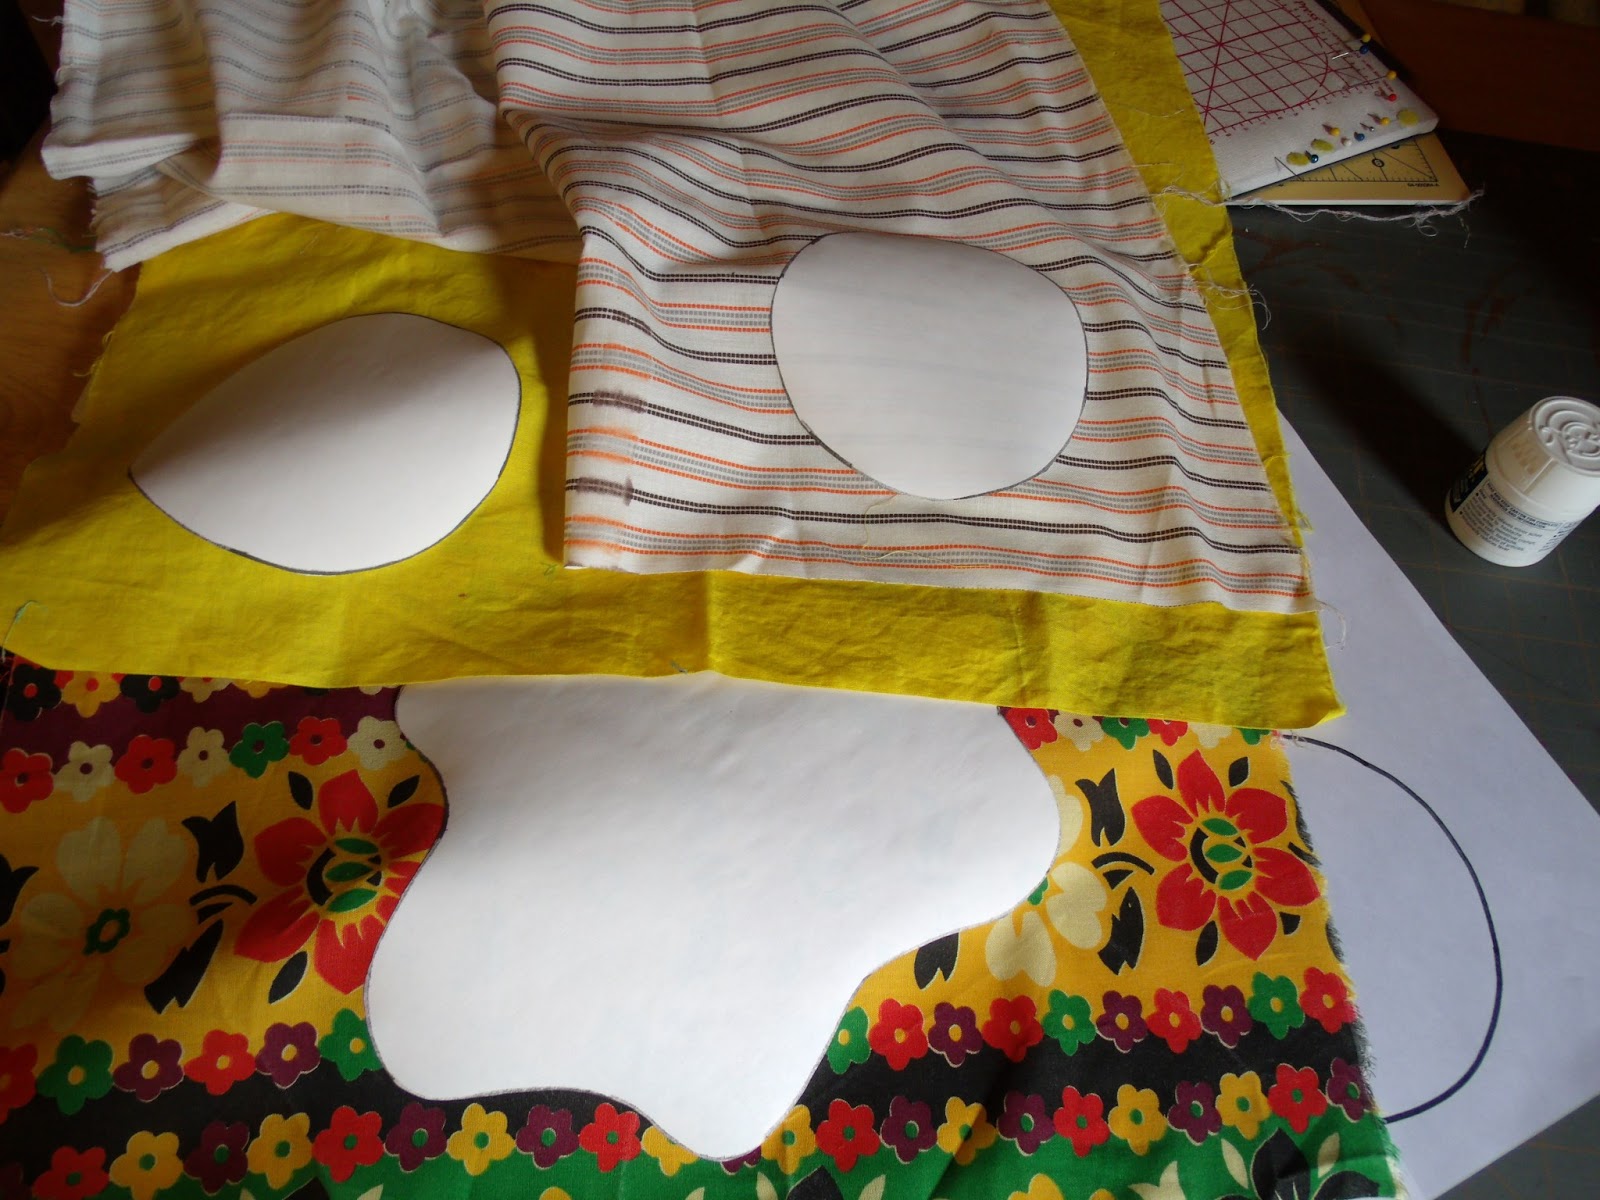
 I went to the trunk first and pulled out some fabric, deciding on a layered flower.  On paper, I drew off the layers of my flower and copied them onto freezer paper that will run through the printer.  For the circles, I simply took a bowl and drew around it. 

After copying my patterns onto the freezer paper (dull side), I cut each piece out (with scissors for cutting paper) and choose my layers of the flowers.

I did some fussy cutting with the bottom layer, realizing that only the edges of it would really be visible. Then I ironed the shinny side down to the fabric.

For the two bottom layers of my flower, I cut the patterns out adding a 1/4 seam allowance.  For the top layer of the flower, because I am making a yo-yo out of it, I cut it out with no seam allowance.  When adding that seam allowance as you cut, don't worry about being exact.


 For the yo-yo, I removed the freezer paper and stitched a running stitch around the circle making a small hem.  Make sure your thread is knotted on the end.  Then I gently started to pull the thread, causing it to gather into a smaller circle.


 Once I have it all gathered, I knot off the thread and clip to keep the yo-yo from coming undone.
 Because I'm doing a layered flower, I can applique the top layers of the flower before putting onto my "canvas".  For the middle layer, I simply did a needle turn applique stitch, which is simply turning the fabric under the 1/4 seam allowance as I go.


 Once I've gone all the way around, I flip the flower over and trim only the bottom layer away.  This will reduce the layers of fabric for quilting later.
 I then added my yo-yo and a button to the center for another dimension.

 From the scraps of the freezer paper, I drew off some leaves of different shapes and sizes, cut them out and ironed them to the fabric.  These were cut out adding a 1/4 seam allowance.
 On my "canvas", I placed the flower.  Since I want my stem to go under the flower, I need to applique it on first, before I applique the flower.  I will also need to applique some of the leaves under the stem, so I played with the placement.  With the fabric cut away from the back of the flower, I fold it in half and make a bud for another flower.

 
For the stems, I cut 1 inch strips on the bias so that I can curve these as I want.
 
That's it for now.  Come back later and see how this art piece turns out.