Bloglovin'

Follow on Bloglovin
Showing posts with label My Own Design. Show all posts

Monday, December 28, 2015

And That's a Wrap!

Another Christmas season has been wrapped up and with it several handmade gifts were given and received.  A handmade Christmas is traditional in our family.  Gifts always seem to carry some family history or significance.

For my kids:

 This quilt was made from a vintage quilt top bought at an estate sale.  I think, because of the pink fabric, it was done in the 1930s.  The scraps used are from clothing.  I gave this to my son, it's about a queen size quilt.
I made this Christmas quilt using precut Moda squares from the Winter's Song line.  It's a small 'Round the World quilt and I gave it to my daughter.  My grandmother made this version of a quilt many times, using smaller pieces.

Before my mother got sick, she had hand pieced three quilt tops and gotten them ready to quilt.  I've had them stored away for the past 5 years and finished up these two for my brothers (I'm still working on the one I kept for myself).

Mother always signed her work, so I took a picture of one of her signatures and printed it onto labels to add to the back of these quilts.
 
My son wanted to do something special for his girlfriend and decided to make it himself.  Not bad for just some straight stitching to make a fleece blanket.  The extra part of this quilt is that the back side has a pocket to tuck your feet in.

Into every quilt a ripper usually comes!


I've got this idea for next Christmas...something my grandmother used to do...and this is the beginning of that idea....something for everyone.  That's a long list, about 14 people.

I bought a jelly roll of 42 - 2 1/2 inch strips.  I sewed the different color variations together and then cut those in 2 1/2 inch strips.  I draw out an idea with black spacers added.  It's going to be very colorful!


So that's it for 2015...time to start 2016.

Monday, June 2, 2014

Tumbling Baskets


 I mentioned that I was doing something new and while this might not look new to you, since it is a very old pattern, I think I did something new with it.

I wanted to take the common flower basket and see if I could design my own block with it and this is what I've come up with.
I've drawn off the blocks on graph paper and I'll have lots of space for applique flower and stems once it starts going together.

 
Here's the basic layout.  
I'm using all scraps, white-on-white, cream-on-cream, and reds.
The background strips are from left over quilt backing projects, All cut in 2 1/2 inch strips.

The basket is made using a half-square triangle technique.  There are several techniques "out there" that you can use to get these triangles.

Assemble the basket as shown.
Here's my input that makes it a little different.

The first outside border strip is added to the bottom, however, don't sew it all the way across.  Stop sewing about half-way across.  If you sew it all the way across, you have to make a Y-seam, and this just seemed much easier to me.
Now add the outside strips in the order shown.

At this point, you can now finish sewing the first strip on.  No Y-seams. 
I like the way the blocks now match up and it will give me lots of applique and quilting areas.  I think if you add another boarder of the outside strips, but in color, it will also frame it up very nicely for another look.  I also like the play on the background color, using all the various scraps I had (harder to see in the pictures).

Friday, May 30, 2014

Going the Next Step

I have this ability to basically look at a picture of a quilt block and can figure out how to make it and it's true to say that, while we all may use the same pattern, the way we turn it or fabrics we use makes the most common pattern unique.  But usually someone else already figured out the pattern, so we are just coping what someone else has already thought of.

But tonight for the first time, I actually designed my own pattern!

I am using a common idea, but how to make it is all my own.

At least I hope it is.

I've purposely not looked on-line to see how others have created their pattern so that I didn't unknowingly copy someone else's idea.  Of course after 30 years of quilting, I've got a lot of impressions in my memories to go from.  But I still don't think my way of creating the block is going to be like anyone else's. 

Hint....I used 2 basic patterns and created mine.

The Log Cabin and the Flower Pot quilt patterns.

I'll work on it some more and hopefully by Monday, I'll have the beginnings of a quilt ready to show you.

The other thing I'm looking at is how to submit a design for fabric.  This one is way over my head, but I think my daughter and I have some great ideas.

I'm really forward to seeing what happens with these two ideas!

Thursday, May 15, 2014

Printing on Fabric

Slowly, I'm beginning to make Piney's Needle, not only a fun hobby, but a business.  Getting ready for the Arts & Ag Tour has really helped.  Once the creative juices start flowing, it's hard to stop them and, do you know what?  I'm okay with that!

My greatest desire is to turn this hobby into a full blown home-based business.  I'm not against a shop in the public someday, but the home-based business is the true way I want to go for now.  Sally seems to be having as much fun, if not more, getting ready for the show too.  We are already talking about what the next show we do will be like.

Last weekend, I remembered some freezer paper that I had bought at the Paducah Quilt Show and had never really used. The thought was to make some quilt labels, so I played around with a business card template on my computer and came up with a label.
After seeing how easy it was to print on fabric after ironing it to the freezer paper (per-cut to letter size, printed on my ink-jet printer), I went a little crazy and started printing all kinds of things!  Next came the logo for the bags I mentioned in my last post, made into a pocket on the bag.
Then I went a step further and I think I've found my passion!


I wanted to make a sample wall hanging to show at the tour of a memory quilt.  So I made one in memory of my mother (ironic that it was also Mother's Day weekend and I was really missing her).

All of the memory quilts I have done so far, have been made from the clothes of the person being remembered.  The quilts were going to be used literally as quilts, so they were selected quilts patterns made with those clothes (not like a T-shirt quilt, which I don't do).

For Mom's quilt, I wanted something smaller and I wanted pictures on the piece.  Mom's clothes were mostly given away, so I didn't want to cut up the few pieces I had kept back.  However, since she made a lot of her clothes and since I have her fabric stash, I have some of the fabric from her clothes, in particular a black and white vest she had made that was beautiful.

I've seen pictures of people put on fabric before, but I wanted one of her paintings on the memory quilt too.  It turned out great.  The colors are a little muted, but I still like it. 
After printing out my favorite pictures of Mom and Dad (that's her high school graduation in a gown my grandmother made), I pulled out some items that Mom had made for me over the years and placed them on the wall hanging (still needs to be stitched down, it's a work in progress).

Mom made the little crocheted cross as a gift for people.  She probably gave away hundreds of them.  While she was sick, so many people would bring food over or send cards and flowers.  Everyone got a thank you with one of these crosses.  She didn't really keep a stock pile of them, she made them as needed, right up until the time she got to weak to do hand work, about a month before she passed away.
Mixed in with the pictures and needlework, I've added a block left over from a wall hanging Mom had made.  The purple irises were one of her favorite flowers.  How fitting that purple is also the color that represents the cancer that ushered her into Heaven, pancreatic cancer.
One last tribute, a listing of names and dates, people she loved and that loved her.  A Bible verse, used for their 50th anniversary, and a sample of her signature with the family crest, the Cross L.

In everything she did, she gave God the glory.

The wall hanging has some more items to be added and a border added, plus the quilting, which I'll probably do by hand, but I think it is turning out beautiful and so meaningful to me.

Last night I printed out a couple more of her paintings on fabric, just playing around, and I'm hooked.  Making art with her art blesses my heart.  It's something I'll continue with.
Remember, if you are interested in buying any of the prints of her paintings, we are offering these to the public with the proceeds we receive going to an art scholarship at the local high school.  Please visit the website and help us raise some money for the scholarship.  It's a double blessing, for you to get the prints and for the students to get the scholarship.

Here's a link to my brother's website, be sure and scroll down so that you can see the 37 prints currently available.  http://www.alewisenterprise.com/franceslewisart.html

We will have some of the prints for sale at the Arts & Ag Tour.  We are stops #26 & #27.  There is a free guide provided, http://artsandagtour.wordpress.com/arts-ag-tour/2014-arts-ag-tour/2014-arts-ag-tour-guide/  We look forward to seeing you.

If you aren't local and are interested in quotes on any of the items I've posted, please contact me at pineysneedle@gmail.com.  Or just leave me a comment.

Sally & I both have Etsy stores where our items shown here and other things are for sale.

www.SallyMarieVintage.etsy.com
www.PineysNeedle.etsy.com

Tuesday, December 10, 2013

The Gifts

I kid you not, my grandmother would start in January making Christmas gifts for the family of over 30.  Everybody always got something handmade.  I only remember one time getting money from her and Papa for Christmas and that was so that I could buy a paint set.  She told me she had to get started early so that she could get them all done.

I usually start about October!

But I've had so much fun making things and getting them ready.  Most everything I'm doing for gifts is using vintage tops or unfinished projects and finishing them.  I did make my son-in-law a small Christmas stocking to match the one I made for my daughter several years ago.  I was informed by her that he needed a larger one to match the one that my grandmother had made for when she was little.  I would definitely need to start in January for that!

Her stocking has the little rabbits on it.  I traced off the basic size for Matt's, found a cross-stitch pattern with a pretty little tree with snow and made his stocking.  They are only big enough to put a wad of cash in, which they did not get this year!


This vintage quilt top is slowly being turned into:
 this!  I'm still trying to figure out how to finish it.  I think that I'll simply square it up with some white corners and try to find a matching red for a border and binding.  I've never worked with hexagons before so if you have advice on how to finish this, please let me know.
I have this one ready to go into the machine, but I can't show it yet.  Little eyes might be watching!
As a group project, my daughter had me hand applique these red and white designs onto a solid black piece.  The pattern is actually a dogwood pattern...I know, you probably don't see it, do you?

The pattern called for the three pieces pictured below.  Each section either had white tips or red tips and then when placed correctly, it made this block.  In the picture of the pink quilt, you can see the dogwood flower is actually made up of the large solid colors (pink).  Sally saw the umbrella and thought of a game her husband plays on his XBox.  We really did try to make it like this, with all the blocks made from the pieces of the blocks, but it wasn't coming out smooth.  So I decided to just applique all the red and white pieces on, after making the design.  That is when the quilt went from this layout like the pink quilt, to all the umbrellas falling.

 Then she is quilting art from the game, Resident Evil.


Above the quilted girl are quilted birds flying around her and the outline of the title of the game.  She's working on a grid in white now in the area where the umbrella designs are.  Her quilting is so cool and she does it so fast.  I think it took her about 2 hours to draw off the girl and quilt her.  I know, it's not to everyone's taste, but I think it will be perfect for Matt.  That's what making quilts for gifts is all about.  Finding something that you know the person will like and you will enjoy working on.

Our family gets together every Christmas day.  It's a little easier on us but not the kids now.  We don't have to try and get to all the grandparents' house, but now they do or the in-laws.  We used to draw names and then everyone got all the children (still in high school) gifts.  All those kids are grown now and we only have two young ones, so we started playing dirty Christmas.  I'm sure there is a dollar amount somewhere, but for me, there's no way to put a dollar amount on something handmade and I make my stuff.

I had some Christmas fabrics that I bought just a 1/4 yard of each a while ago.  I saw a simple block design that I had wanted to try out on the internet and so I made a lap quilt as my dirty Christmas gift.  I'm going to do another post on it and some of the pitfalls that I stumbled over while putting it together.  But this morning I got the binding on and it shouldn't take me too long to whip it down tonight.

The gift that my husband will be bringing for dirty Christmas involves this lady.  That's all I have to say about that right now!!!  Spoilers!

I really believe what Grannie enjoyed the most about the gifts of Christmas was all the time spent thinking about the person she was making it for and how they would use it.  In her own way, it may have been how she prayed over her family throughout the year, as she worked on those gifts.

Saturday, May 25, 2013

Blank Canvas

Quilt designing is very much like painting with fabric.  You start with a blank canvas and then start to create, adding color, turning blocks, until finally it is pleasing to your eye.  While lots of quilts have the same pattern name, the way the artist changes the placement or color makes every quilt a unique work of art, no two alike...even if you try. 

Applique gives you even more freedom to change up the pattern or design.  In fact, you really do start with a blank canvas and can put anything on it.  I wanted to do some wonky flowers with my grandmother's vintage fabrics.  Here's what I came up with.

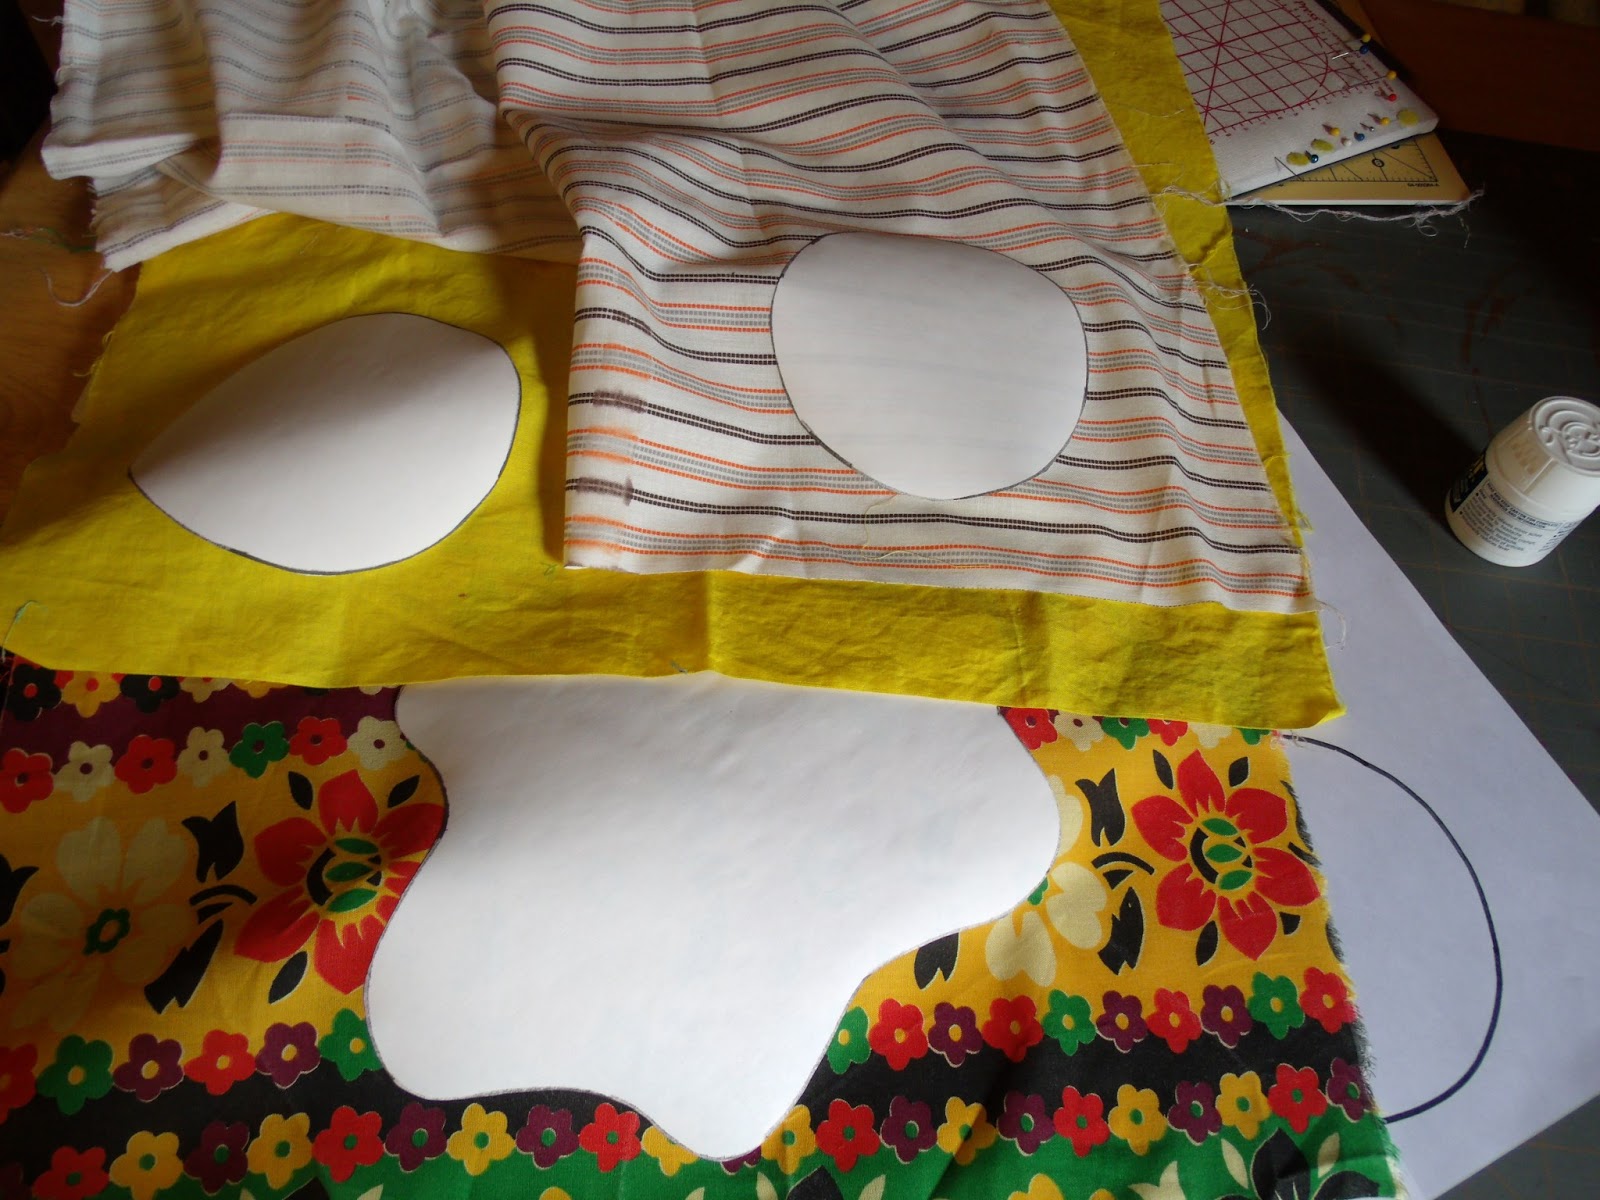
 I went to the trunk first and pulled out some fabric, deciding on a layered flower.  On paper, I drew off the layers of my flower and copied them onto freezer paper that will run through the printer.  For the circles, I simply took a bowl and drew around it. 

After copying my patterns onto the freezer paper (dull side), I cut each piece out (with scissors for cutting paper) and choose my layers of the flowers.

I did some fussy cutting with the bottom layer, realizing that only the edges of it would really be visible. Then I ironed the shinny side down to the fabric.

For the two bottom layers of my flower, I cut the patterns out adding a 1/4 seam allowance.  For the top layer of the flower, because I am making a yo-yo out of it, I cut it out with no seam allowance.  When adding that seam allowance as you cut, don't worry about being exact.


 For the yo-yo, I removed the freezer paper and stitched a running stitch around the circle making a small hem.  Make sure your thread is knotted on the end.  Then I gently started to pull the thread, causing it to gather into a smaller circle.


 Once I have it all gathered, I knot off the thread and clip to keep the yo-yo from coming undone.
 Because I'm doing a layered flower, I can applique the top layers of the flower before putting onto my "canvas".  For the middle layer, I simply did a needle turn applique stitch, which is simply turning the fabric under the 1/4 seam allowance as I go.


 Once I've gone all the way around, I flip the flower over and trim only the bottom layer away.  This will reduce the layers of fabric for quilting later.
 I then added my yo-yo and a button to the center for another dimension.

 From the scraps of the freezer paper, I drew off some leaves of different shapes and sizes, cut them out and ironed them to the fabric.  These were cut out adding a 1/4 seam allowance.
 On my "canvas", I placed the flower.  Since I want my stem to go under the flower, I need to applique it on first, before I applique the flower.  I will also need to applique some of the leaves under the stem, so I played with the placement.  With the fabric cut away from the back of the flower, I fold it in half and make a bud for another flower.

 
For the stems, I cut 1 inch strips on the bias so that I can curve these as I want.
 
That's it for now.  Come back later and see how this art piece turns out.