Bloglovin'

Follow on Bloglovin

Monday, July 18, 2011

Black & White Log Cabin Quilt

My latest project has been working on this 8 1/2" block of black and white log cabin.  I really like the way it is looking on the design wall.  I think, after playing with it many times, this is going to be the overall design of the quilt.

Here is my material selection and the first cutting of 1 1/2 inch strips with 2 1/2 inch center blocks.

I then took my blocks and sewed them to my first light strip, leaving just a little space between the black blocks for trimming later. And while this goes very quickly and I'll admit that on the next strips I put my blocks even closer together....I discovered an even easier way to do my first two pieces together.


Instead of cutting all my 2 1/2 inch blocks and then sewing them to my first strip.....I sewed the center strip (2 1/2 inches wide) to the first light strip (1 1/2 inch wide).  Then I cut those into 2 1/2 inch sections.  It saved one step by doing this.


Back to the blocks on the first strip and to the ironing board.  Because I didn't butt the black blocks right up to each other, I had to do some extra trimming on this set of strips.  I ironed the strips open and then cut them into 2 1/2 inch sections.
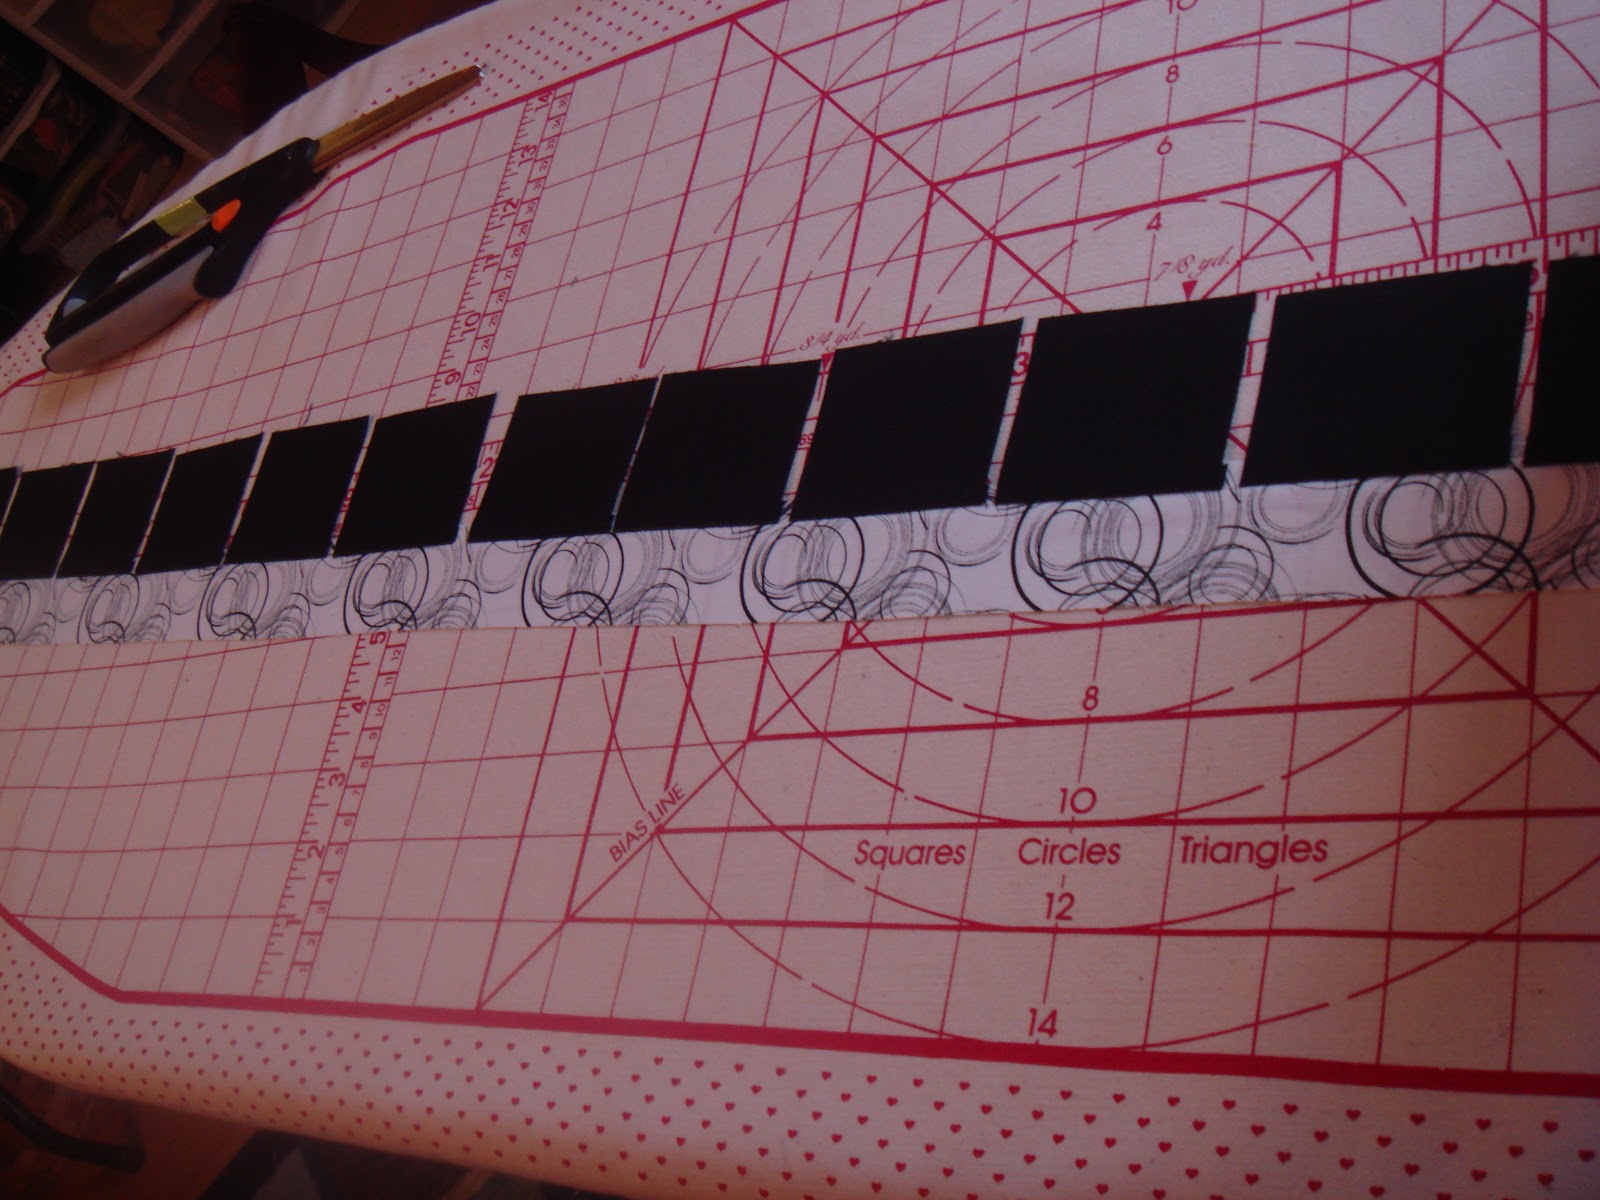


Once I got the hang of what I was doing, having the blocks closer together meant that I didn't even have to use the ruler.  I actually cut them all before ironing them open, using the previous block as my guide.  Just make sure that you cut them straight each time.

Back to the sewing machine to add the second strip of the 1st light strip.  I lay the blocks I'm adding all the same way so I don't confuse myself and add the strip to the wrong side.  Then going to the ironing board, I do the whole process all over again.


This strip is now ready to be cut.

After adding the first light "logs", it's time to add the dark "logs".  Working from the side where the last strip ended, I add a dark strip.

Back to ironing and cutting, then ready for the 2nd "log" of the 1st dark strip. I will continue this same technique with each strip, alternating between adding 2 light strips and then 2 dark strips going in a circular motion around the center.  I'm using 3 shades each of lights and darks.

I worked up this stack of blocks last night while watching (listening really) to a movie.  I have all my lights and darks laid out and a finished block handy to remind me of how to add my strips.

Traditionally, the center block of the log cabin block is done in yellows or reds to signify the hearth of the home, the fireplace.  While it's true that almost every log cabin built (the actual log cabin house) does have a fireplace....it's not the center of the home as it once was.  In the first log cabin homes, the fireplace was the place the family would gather to warm themselves, add light for evening activities, and cook the food.  Today, the fireplaces are mostly for looks.  Families still gather around them for warmth, but truthfully...the fireplace is more for ambiance.

When we were building our log house, a small log house, we were talking of not even putting a fireplace since we are doing central air and heat.  But it seems that most people just think it's wrong not to put a fireplace in a log house and I ran into the same people when buying my material for this quilt.  When I told the lady at the quilt shop what I was making, she insisted that my center block be at least orange or red (since I didn't want yellow).

It's hard to buck tradition...but as you can see...I did.

Monday, July 4, 2011

Red, White, & Blue

Blog hopping today...I'm expecting to see lots of flag quilts, so I thought I would show some too.  I made this quilt for my nephew's wedding gift, but then didn't get to give it to him until Christmas about 9 years ago.  He went to Iraq right after that for two tours.  He fought for freedom.
The wall hanging was made using a pattern from Square in a Square technique with fabric that already had the flag printed on it.  I love how the flag is actually in the center of a star design.

While he was in Iraq; I smocked this dress for his daughter to wear.

The picture is not great, and it was an old project made for a door prize at a ladies retreat in Alabama at least 12 years ago, but I made this flag wall hanging, actually constructing the flag, using a dark blue print that had stars in it.  I can't remember if I did the design on my own or saw it somewhere.  I wish the center showed up better.  I think I wrote 2 Chronicles 7:14.....

If my people, which are called by my name, shall humble themselves, and pray, and seek my face, and turn from their wicked ways; then will I hear from heaven, and will forgive their sin, and will heal their land.

Remembering today that we live in a country fought for by men and women who came to a new world so that they could worship God freely and a nation was formed.  Freedom was not easily won.  Peopled died, lost loved ones, lost part of themselves...but they fought and won.

Today, most of us take for granted what freedom cost and still live in captivity of some sort.  True freedom was fought on a cross and can be yours no matter what country you live in.  Today could be your independence day.

Monday, June 27, 2011

Adding to the Purple

This weekend I pulled out the purple cancer quilt and made a couple more blocks for it.  I'm fixing to teach a class on the log cabin block, so I thought I would play around with the pattern.  I ended up with a block about 16 inches, using 2 inch strips (plus seam allowance).  That was too big for my quilt, so I needed to trim just a little off.

I decided to split my logs and turn the blocks to get a different look.  I'm sure somewhere there is a version of this out there, but for me, tonight, it was my own creation and I'm calling it the Split Log Cabin Block.

I didn't take a picture of the block before I cut it, but it was a traditional setting with a 4 1/2 inch center block.  I added darks and lights (with a little yellow tint) on both sides as I built my block.  Once done, I found my centers, both directions, and cut.  I flipped the 4 new pieces until I was happy with the new look.  It took a little trimming to get it down to a 13 1/2 block, but nothing major and it looks great with the rest of the quilt.

With the left over "logs", I sewed the strips together and made some 4 patches, putting them all together until the block was the right size.  I had to add a little border to get the measurements just right.  So far I have 12 blocks and one center block that still needs a border around it.


Monday, June 20, 2011

Starburst

I saw a version of this block and decided I couldn't wait for the directions to come out in the magazine.  Their's was made with 80 pieces, mine was with 40. And I turned my pieces differently.  It reminds me of a starburst...hence the name I'm calling my version.
 Not having a pattern, I had to figure out how to put it together on my own and the centers didn't line up as easily as I would have liked.  I'm hoping that after it is quilted, it will lay flatter than it does now.  I used a strip method for the pieces and then cut on the 45 angle.
 This is the block and I fudged a lot of the points.  I suggest you wait for the magazine for their pattern,  I was ready to put the thing away, but tonight I put it together with hand piecing and it was much better than on the machine.
 I added a border and now it's ready to prepare for quilting.  I really love the color combination.

Wednesday, June 1, 2011

Final Stitches

Summer is officially here!  Hay is on the ground and I won't see Adam again until it rains or the leaves start to turn colors.  He's working on that farmer's tan and getting his clothes as greasy as all get out.  Three washings finally got the grease out of the pockets!  If you happen to know a trick for getting grease and cow poop off blue jeans....please share!

While the men worked outside this weekend, I played with my mother's sewing/quilting machine.  I've been a little scared of quilting with it, but I bit the bullet and played with a couple of pieces.
Janome Memory Craft 6600


 Here was my first attempt at straight lines.  The pieces were left over from my Nine-Patch quilt.  They are the Disappearing Nine-Patch pattern that I used in my class when showing the students some of the variations of the Nine-Patch.

I think this made a cute little doll quilt that will be put away for a future grand-daughter....no rush on that!

I found that using the auto-stitch option made my stitches even. 
 Then I played with the free motion setting with another Disappearing Nine-Patch made into pin-wheels for a small table runner.

I was a little tense doing this, but started to get the hang of it too.  I don't think I had one of my settings right, but I really like that technique.
 These two pieces are now ready to be quilted.  I love the greens and roses of this Nine-Patch sampler.  There are 3 different sizes and techniques of the Nine-Patch used in the lap quilt.  Then for fun I added some applique.  I call this one "Chasing Butterflies".

Here are some of the applique pieces close up.  I used bullion stitches for some of the flowers.  Several of the patterns used are made from templates found in my grandmothers' things.


 This is my Nine-Patch set together with 2 1/2 inch strips.  I don't have the name of the material, but it was a new line that came out a few months ago.  It is all done in country rose, greens, reds, and creams.  All machine pieced.
Now I just need to get brave enough to put these in the machine!

Tuesday, May 24, 2011

Daisy's Butterfly

Butterflies....don't you love them!?  I do, so when it was time to teach another class...my first "paid-for" class!!...I taught a class on applique using a butterfly design I found in my grandmother's things.  The instructions and pattern are available to purchase with a PayPal account through Scribd.  This is a first for me too!  I would love some feedback!

Daisy's Butterfly - Applique & Pattern

Thursday, May 19, 2011

Mystery Quilt, Projects & Lots of Pictures

 The thing about going through my grandmother's quilts is that some of them are so old that we don't know the history behind them.  Like this quilt.  I call it the puffy quilt.  The back was falling apart when you touched it and my uncle was ready to toss it in the trash as being in too bad of shape to do anything with.  Thankfully, my brother stopped him and gave it to me (yes...I take trash!).  But it wasn't trash.

It is made of very fragile fabric and the back was literally disintegrating when I touched it.  So, before it even got in the house, I ripped the back off.  What I found was a treasure.

Each square, about 2 inches, is completely finished with backing, top, and batting.  The batting is pure cotton stuffed in each square and then tied to hold in place.  The finished squares are then sewn together, by hand and machine.  The quilt is extremely heavy.
 The backing is done in flour sacks for the most part.  Some of the pieces have printing on them.
 Only a few of the squares are falling apart and this is a picture of the cotton in one of them.  My dad said it was uncorded cotton. My grandfather used to cord all the cotton for my grandmother's quilts.  That was back in the 30's.  The twisted cord goes around the entire quilt (about the size of a twin bed) and a couple of the tassels are still on it.
So.....can you name the quilt?  I would love to know what it is called and any history someone might know about this kind of quilt.

Here are some pictures from my latest applique class.  I took one of my grandmother's old patterns and used it for the class.  Since the blocks that I had were made with scraps from my grandmother's and great-grandmother's dresses, I called it Daisy's Butterfly.  The ladies are transferring their patterns using different techniques and materials...good old scrap cardboard, card-stock paper, and plastic template.


Cindy's mom gave her this neat little "button" that adds a 1/4 inch seam allowance to your patterns.  You simply put your pencil in the center of the "button" and trace around your patterns.  We all want one, but we aren't sure where to find them.  It's called a Rolling Seamer.
 Here's a couple of projects that I have going.  This Dresden plate table runner, which I've called Spinning Plates, is ready to be quilted.  The Nine-Patch below is from my first quilting class.  I've done a variation of the Framed Nine-Patch, but with my own twist. 

How do you like my Mother's Day gift (below) from my son?  He is turning wood and doing a great job.  His is the larger on (on top).  My grandfather whittled the one on the bottom.  My gift was a surprise and I've made pizza dough and and biscuits with it so far.  Adam told me if was for using...not just for looking at. 
 Here's a couple of his other works.


A walking stick for my dad and a couple of bowls.  I think they are great.


 I found some early art of my grandmother's.  I love the technique she used on this picture.  I know it was just practice work, but I really like it and will be framing these as a set of about 3 or 4 pieces.
 My brother thought this was some of Grannie's stockings.  But it is a slip for a young girl.  It has a gathered, dropped waistline and you can see where the pink ruffles used to be all over the skirt of the slip.  It had to have been my grandmother's back in the 20's.

 I love this picture of my mom, when she was in high school band....and my dad this past weekend.  So many treasures....so many memories.