Bloglovin'

Follow on Bloglovin
Showing posts with label state quilt block. Show all posts

Wednesday, March 19, 2014

The "Star" of the Arrowhead Quilt Block


With the use of the internet, finding quilt patterns is fairly easy today.  More than likely, you can find a free PDF version on-line of any basic pattern, if you search long enough and in the right places.  Many of the vintage patterns have been re-made using modern techniques.  While this is wonderful, I fear there is also something being lost in the art that our grandmothers or great-grandmothers created when we use these modern techniques.  It really is okay to slow down in the process of quilt making and just enjoy the journey of creating.
When searching the internet for ideas for a two-color quilt, I ran across the image of an old pattern found at the blog of A Vintage Cottage Home.  In the description, the author of the blog states that the vintage pattern was found in the Tuesday edition, March 28, 1933, of the Lansing State Journal publication.  All the clipping said about the block was that it was an 18 inch block.

I fell in love with the block and while sitting in a hospital waiting room, I drew off the pattern and by that afternoon, had the block assembled.  But it took some work and I couldn’t find an on-line pattern that was 18 inches.  However, after figuring out the pattern on my own, I found the clipping below in my grandmother’s scrapbook of pattern clippings from 1930’s publications.  The pattern is part of The States Patchwork Quilt Parade #20, by McKim Studios for Michigan.  I’m not sure what publication this clipping is from.  The block described in this clipping is 16 inch.  The name, based on the arrow block, is in honor of the Native Indians that once lived in the area.  That’s why I have chosen it as my signature block for Piney’s Needle.  Where my home is, here on the Piney River, was also the home of Native Indians.  Buckets of arrowheads have been found in the fields and along the river.  Just last summer my husband found one while working in our garden.  If I can ever talk my guys into helping me hang a quilt block on our house (like the barn quilts), this will probably be the design.
My internet search came up with all kinds of patterns for blocks called arrowhead, but very few followed the design Rudy Short McKim created above and those that did, didn't give instructions for the 18 inch block.  I found that to be the tricky part of making my block.
 The block itself is just a basic 9-Patch layout. 

To make the points of the star (in the center) or the top and bottom portion of the arrowhead (which I focused on) took the most time in creating the block.  It is actually a flying geese pattern, but because the width and length of it are not divisible evenly to make an exact square (for example 2 1/2 x 4 1/2 inch) I couldn't use the more modern methods (or "I couldn't figure out how" might be a better way of saying it).  So I went a different way, maybe more old school.
This picture is of the tail of the arrow, but it is the same method used for the points of the star, the colors are just opposite.  This strip is 6 1/2 x 2 1/2 inches.
 You can see in the pictures, that at the center of my "flying geese", the fabric actually overlaps each other.  To get the right look and not have the point cut off when added to the center block, the sewing line needs to angel from the outside corner to 1/4 inch up from the bottom of the 6 1/2 inch strip, at the center of the strip.
(The picture below shows the finished strip from the back.)
(My pictures show both the black strip/white points and the white strip/black points, don't let that confuse you.)
 To make the points of the star, cut a square 3 3/4 x 3 3/4 inch, 2 for each strip.  The picture above shows the placement of the 3 3/4 inch square on the 6 1/2 inch strip.  Sew on the marked line, then iron the 3 3/4 inch square down toward the corner of the strip.

 Flipping the strip over, trim away the excess fabric, using the 6 1/2 x 2 1/2 inch strip as a guide line. 
You now have 3 layers of fabric at the "point" of the strip.  Open up the top layer and trim the 2 bottom layers away, cutting 1/4 inch from the sewing line.
Do the same thing on the other side of the strip.


 To make the "star" of the arrowhead only, do 4 points as described above.  The center of the star is a 6 1/2 inch square with 4 - 2 1/2 x 2 1/2 inch square corners.  This makes a 10 1/2 inch block.
 
 Notice the bottom star point in the picture above.  That's where I tried to make the flying geese with a more modern technique and failed (sewing from corner edge to center).  The center point of the "point" gets sewn into the seam.  The other three points look much nicer.

Using the Arrowhead pattern with added borders, I created this lap quilt, the design is called "Piney's Arrowhead".  It took about 2 1/2 yards of black and white material each to make this 54 x 74 inch lap quilt in black and white.


Saturday, July 14, 2012

Yesterday

Yesterday...not as in the day before today...but as in the days of many years ago...when Mom showed me how to make my first stitches of embroidery on bell bottom blue jeans (a beach scene) and how to cut out a pattern.  As in the threads passed down from mother to daughter from generations back.

My daughter has asked me to join her in a street fair.  Another mother and daughter team.  Sally loves all things vintage and already has lots of items made, jewelry made from older jewelry, some unique designs and some of her fashion line.  I'm to make some quilted items.

A friend gave me a box of old quilt blocks from the 1950's.  Sally ironed all the pieces and then laid out my projects....table runners and 2 baby quilts to be sold at the fall street fair.  We are deciding on a name for the booth now...New Again...or Like New.

I also decided to finish a baby quilt that I already had finished piecing and layered.  It just needed the quilting done.

So here are my finished projects so far (well almost...I still have the binding to put on the baby quilt).


I still have 2 more tablerunners to assemble, one wall hanging and 2 baby quilts with these star blocks.  I'm not touching the blocks in any way, which means I leave all the imperfections and wrinkles.  They are totally unsquare, but I just went to an art show and none of their blocks were square (The Quilts from Gee's Bend)...same time frame...same art!

Then I looked down and saw my mother's hand, my grandmother's too.  That's what this is all about...passing down lessons from years past until finally we just seamlessly go from one woman to another.

Sunday, April 1, 2012

Maryland Beauty Quilt Block - Grannie's Scrapbook

One of the things that my four generations of quilters have always done is keep scrap books of quilting or sewing ideas.  We cut out and paste or put in folders ideas of things we want to try.  My grandmother kept some of hers in this Jumbo Scrap Book.  She has notes of quilting guilds she attended, who attended and what their projects were.  This particular book has the guild information from the early 1930s.  Grannie was married, with only one child then, and some of the guild members were her sister-in-laws and her mother-in-law.  She was in Texas at the time.
 I'm not sure where she got her clippings, but most look like they came from a quilt magazine and for $.10, you could mail off and get the pattern.  Some times the pattern was included with a little information about the design, but the directions weren't quite as detailed as we are used to now.

This was the first clipping in Grannie's scrap book, The Maryland Beauty.  The directions give how much material would be needed for a full quilt.  If you look closely at the pattern, The block was to be 9 inches.  Using copies of the pattern pieces, to get a 9 inch block, those half square triangles are tiny!

I decided to recreate some of my grandmother's dreams.  My first step was to go to the internet, however I couldn't find any patterns with the half square triangle.   I did find what appears to be a cross stitch pattern here.  And I also found a variation without the half square triangles here.   I found a website which listed all the state block, but no directions here.
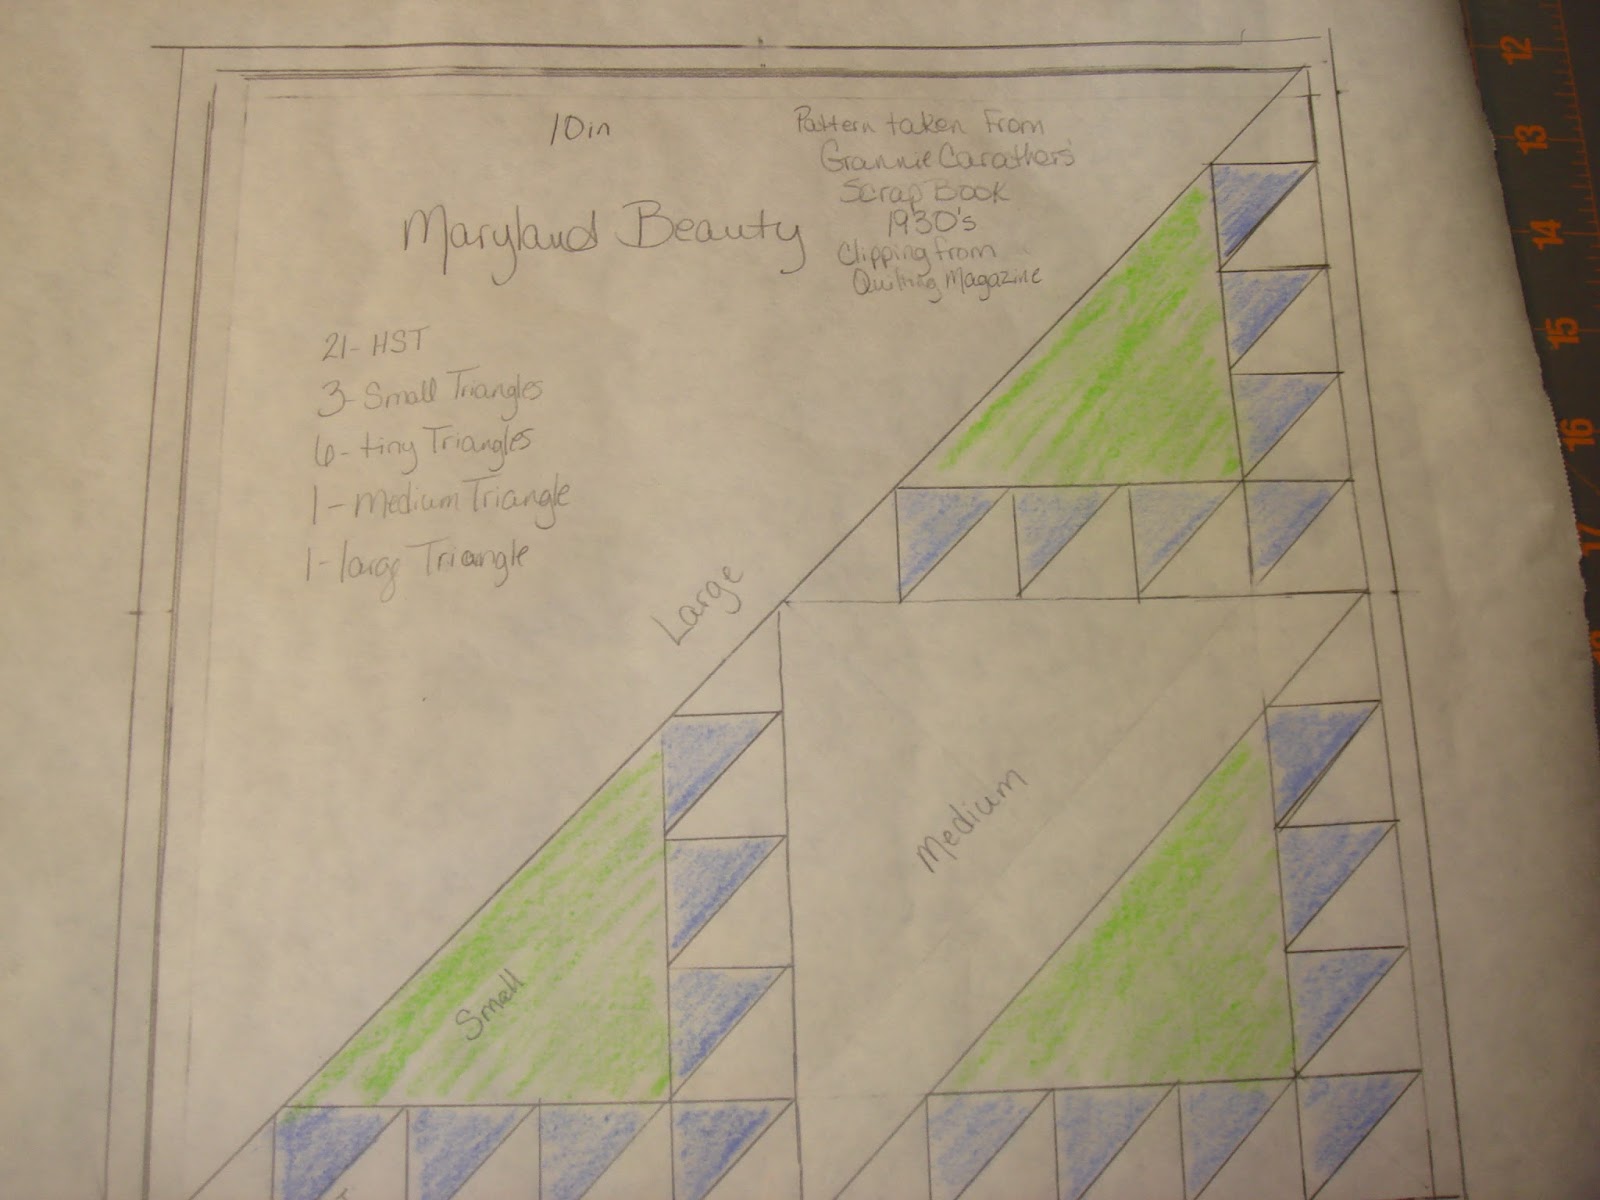
Since I had no luck with finding a good pattern, I made my own.  I wanted my half square triangles to be at least 1 inch, so....I made my own pattern using a 10 inch square finished block.  I divided the pattern into sections and marked where my HST would be.
Then I erased the extra markings on the pattern.
And added the HST placements.
The clipping suggested making the small triangles in light blue and then doing the HST in assorted colors, all on white, quilting with a curved feather in the large open space.  I added some color to my pattern just for fun.  Then I made some plastic templates for the triangles, tiny, small, medium and large.
Because I already had some HST made from this fabric, I went ahead and used a similar blue fabric for the small triangles and the background from the same background as the HST.
I pieced the HST (4) first, then the strip of 3.  To the strip of 3 HST I added the small triangle and then attached the strip of 4.  Oh, there is a tiny triangle at the top of each strip.
The final Maryland Beauty block.

Well, I saved my $.10 by making my own pattern....of course it took most of the day!