I make that statement to people asking me to quilt for them. I don't have a professional quilting machine or taken any classes. I'm basically self taught (in the last 5 years, machine quilting) and am still learning every time I sit down to the machine.
This new project has me definitely learning a few things and a professional quilter would probably cringe with what I'm about to show....but it's working for me and I'm not out to try and win any contests.
I was given a vintage quilt top bought at an auction for $35 and asked to quilt so that it could be resold in a local arts & craft store. I normally do free hand motion quilting with loops or stipple design, but the owner of the quilt wanted it quilted "where you only see the quilting on the back". The nearest thing I could figure out he was talking about was to do a "stitch in the ditch" or "outline quilting". That sounds easy enough, but after quilting the first two blocks, I had huge wrinkles on the back.
I also had to work with a quilt top that had wrinkles worked into the blocks (see the brown strips in the picture above). Pulling out the handy ripper and undoing those two blocks, I did some research (on-line) and started over. The first strip of blocks (working from the top across) really wasn't much of a problem, but turning the quilt in the machine to go around each sail was still causing some issues. It's a queen size quilt, so when I turn it at certain points, that means taking all the quilt through the opening in my machine (Janome Memory Craft 6600) and there just wasn't enough room. By using the backstitch option on my machine, I eliminate a lot of the turning. I'll show you what I did, trying to explain it in words and pictures, but I also did a couple of videos (and they won't win me any awards either! I'll apologize in advance for the very, very poor quality).
After finishing the first row, I rolled it and pined it in place (with safety pens).
Now I'm ready to start on the second row of blocks.
Turning the quilt so that the rolled top is in the open area of my machine, I pull up threads to begin quilting at the top of one of the "sails" of the boat pattern..
Then I backstitch to the far corner. In the video I'm doing this with one hand guiding and the result is crooked stitches, but with both hands free and using the brown fabric as a guide the stitches are fairly straight.
WARNING: When you are done with the backstitching, let up off your peddle before letting go of the backstitch button. If you don't, you will sew forward again and possibly get out of line. (I speak from experience here and you can see that in the video as well, although I don't point it out.)
I told you it was a rough video, but I think you get the idea. Here's another video where I talk you though what I'm doing. Still rough, so you might want to take some sea-sick pills.
So here's some still shots of what I went over in the two videos.
Making the turn at the corner (after backstitiching) I now turn the quilt so the block is facing me and sew straight down to the outside edge of the bottom of the boat.
Pivoting at this point (and you can see from the quilt that the creator of the quilt did not get all her points of the half square triangles to work out just right, some of them got sewn into the strips) I sew on the outside seam of the bottom of the boat all the way across.
Pivoting again, I sew from the point of the boat to the bottom of the block.
(allow me to show this next step with a different block)
Stitching straight down to the point of the block, I could either backstitch all the way across or turn the quilt so that the bulk of the quilt is now in the open area of my machine. Either way will work, in the picture below, I turn the quilt instead of backstitching. This is the only time the bulk of the quilt is under my machine.
To get back up to the boat, I turn the quilt (facing me) and backstitch to the inside point of the boat. I will cross over my previous stitching line for a couple of stitches and I try to stay right on top of them so that I don't have double lines.
Now, I'm position to quilt the inside of the boat. doing the same thing again, stitching down, across and back up, remaining inside the boat when I turn. This time I do use the backstitch function and, using the seam as a guide, backstitch across the inside of the top of the boat all the way across. At the other side (sorry, no pictures for this), I follow my stitching line and "get into" the yellow fabric and sew across the top of that same seam all the away across. (still no pictures but outlined in the 2nd video) I match my seams on the side of the block and stitch to the top, backstitch from the corner to the first sail and then stitch down the outside seam of the first set of sails. Now I'm at a point where I can move to the inside of the bottom sail and work the inside of it and continue working all the sails, inside and outside the seams.
When I'm done, I end up back at my starting place with only my beginning and ending threads to tie off and hide.
Here's what the back of the block looks like. I still need to go back and add the quilting on the brown strips, but I'll do that after all the boats are quilted.
I'm sure a professional quilter will say that this is not the way to do this....but....it works for me!
My first practice piece for the Free Motion Quilting Challenge was free motion leaves, although most of mine look more like hearts. I used a light print with blue flowers and red berries on it, and quilted with YLI machine quilting thread, natural color, weight 40 (I believe). I have Jancome Memory Craft 6600 quilting machine.
Here's a picture of the back of the sample.
To put the quilting into perspective, here it is next to a ink pen.
Because of the print on the material for the top of the sampler, you can't really see the design. I had a hard time seeing where I had already quilted and overlapped a few times. My daughter suggested that I use red thread so that I could see it better., but I wanted to get used to quilting with white thread.
I wanted to practice a bit more and really be able to see my work, so I got some scrap material and quilted white on red. I liked the outcome much better. I could even do the leaves upside down...so I felt pretty good about that.
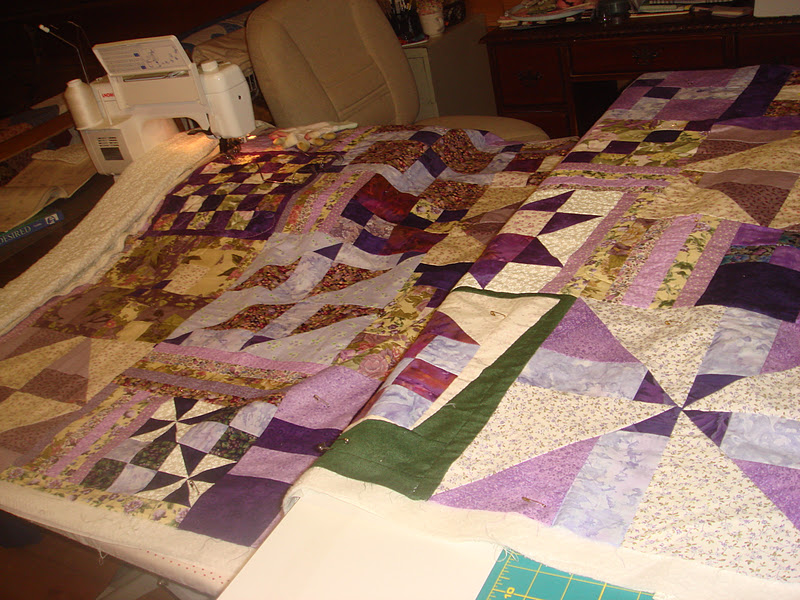
I started quilting the purple quilt last night. This was the first large quilt that I done on the quilting machine. It was a little overwhelming. Mom and I had taken a quilting class once and I learned to quilt using my machine....but not her's. That was something that she was going to show me how to do. We didn't get the chance. So I had to figure it out on my own. I finally got all the adjustments right, so of course now I've got to stay in quilting mode because I will have to figure out the normal sittings again.
I set up the quilting machine on a long table. Beside the table I set up my cutting table and in front of that, my ironing board. That gave me plenty of room to keep the quilt fairly flat and straight while I was quilting.
I did just loops using my free motion stitch, since the quilt was so busy anyway.
I quilted across the short length and rolled the finished part up "in" my machine. As I got more and more done, I could remove the cutting board table.
Then when I got past the half way point, I moved the table to the other side of the ironing board and worked from the short side of the quilt. It worked out pretty good and I only got one small wrinkle on the back side. I'm pretty proud of that.
Within the quilting I hid some special messages This "cross L" was my mom's signature on all her art and also the brand on all the cattle on my dad's farm. Then I started using the "cross dlb" for mine, but it didn't turn out as good. I put the dates, 2011, "mom", and "Lewis" all within the quilting....but you would have to really look hard for most of them. I'm not even sure if I could find them again.
All it likes now is the binding. I need it finished by next weekend. The local Halmark gift and card shop has agreed to put the quilt on display during the month of November for pancreatic cancer awareness.